
Setting up
Downloading VirtualBox and iso images
VirtualBox Download
Below is the link to download VirtualBox.
Windows 10 ISO Download
Below is the link to download the Windows 10 ISO. I will walk through how to download it.
Windows Server 2019 ISO Download
Below is the link to download the Windows Server 2019 ISO.
https://www.microsoft.com/en-us/evalcenter/download-windows-server-2019
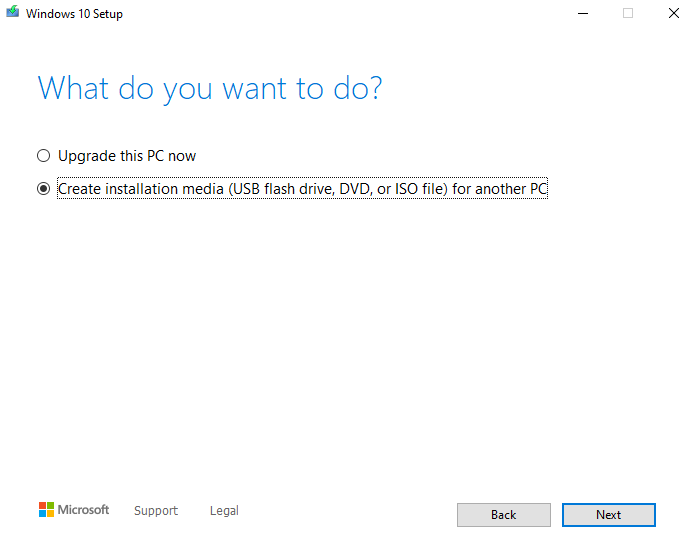
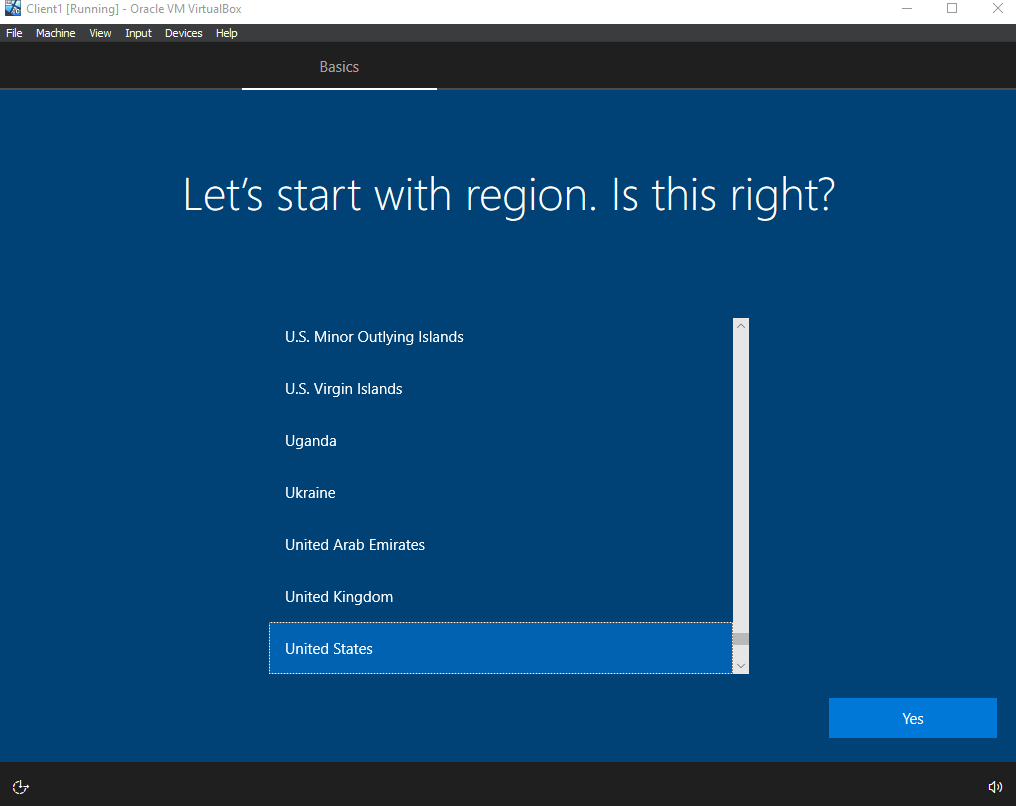
For the Windows 10 ISO Download, as of June 20th, 2023, you’ll have to download the media creation tool. Accept the license terms, and once you reach the window shown below, select the second option.
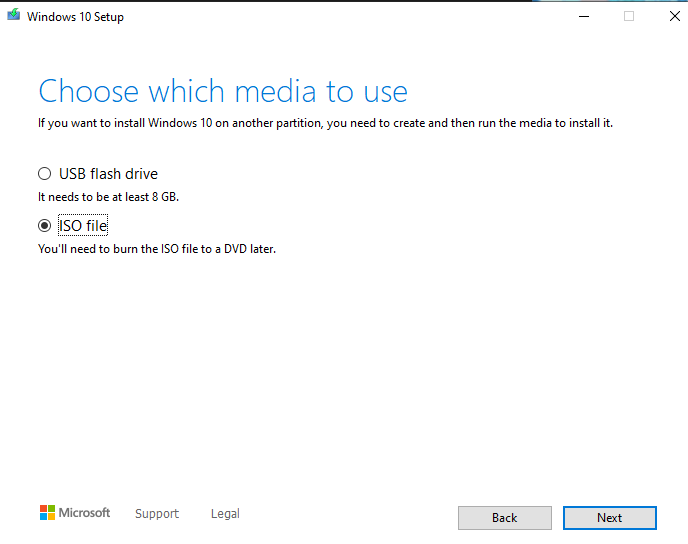
Click “Next” on the language architecture and edition window. Then select the “ISO File” option and download it. Once it’s done, click on “Finish”.
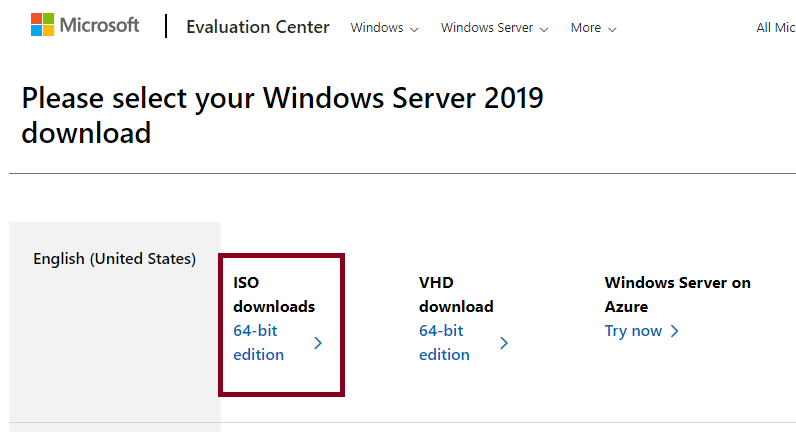
To download the 2019 server, go to the link above, click the link as shown in the red box below, and select the location to save the ISO file.
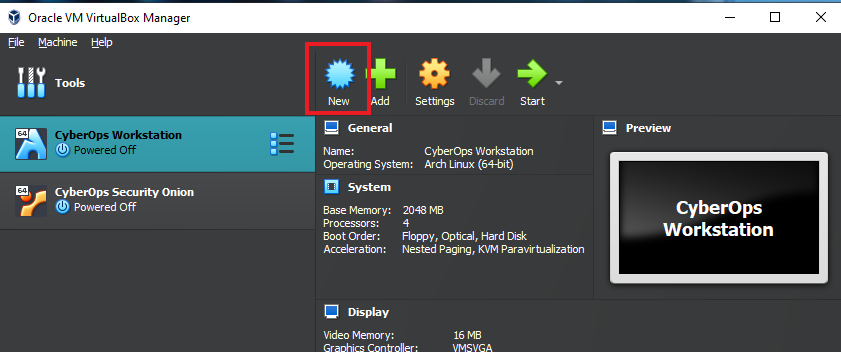
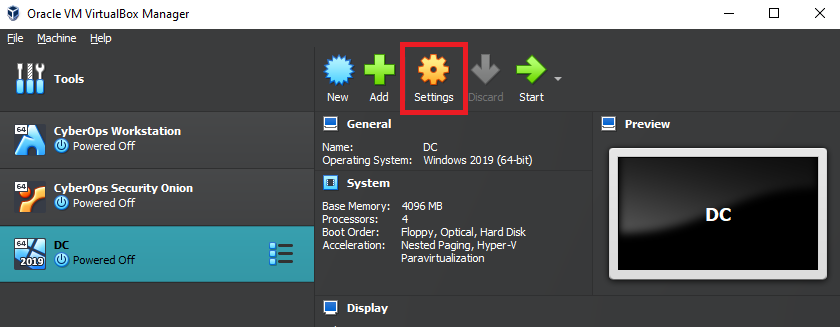
After getting the ISO Images, open up VirtualBox and click “New”. (Ignore the other VMs I have)
For the name, we can just do something simple like “DC” for Domain Controller. I didn’t change anything for the Folder, but for the ISO image, I selected the Windows Server 19 that we downloaded above. After selecting the ISO, VirtualBox will immediately detect the Type and Version.
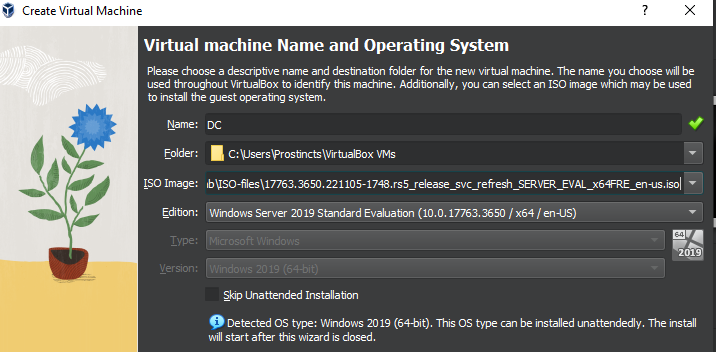
Below the Version, make sure to check the box to ”Skip unattended installation”.
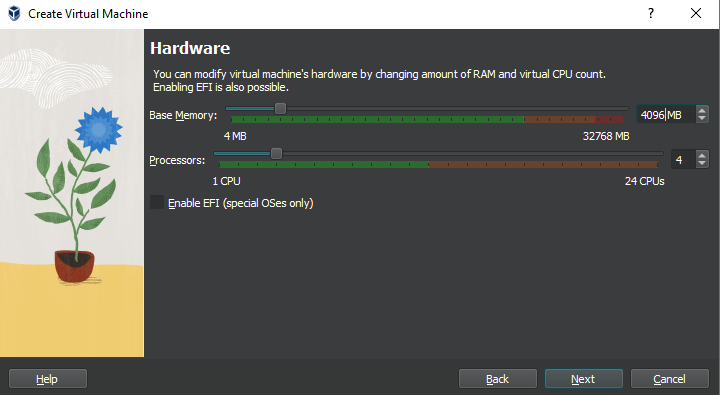
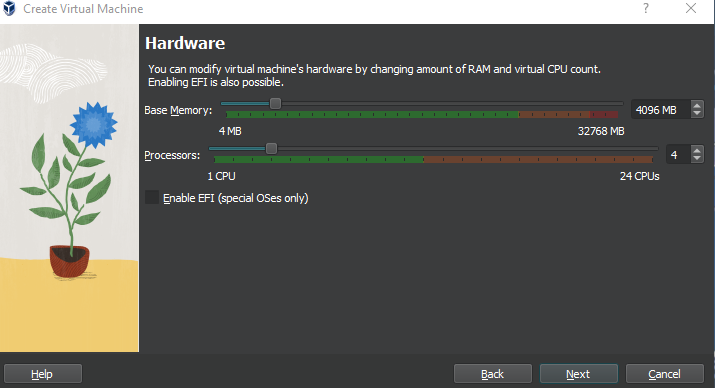
Once in the hardware Window, I selected 4096 for memory and 4 CPU Cores. But depending on how much RAM and CPU Cores you have, you can select the same, or cut these down to 2048 and 2 Cores.
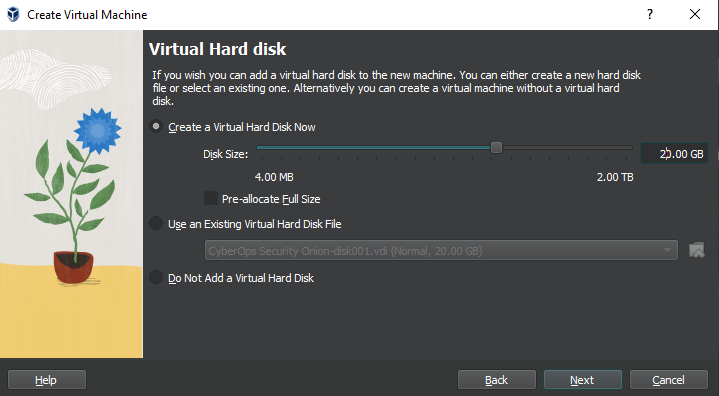
In the Virtual Hard Disk window, it initially had 50 GB, but I reduced it to 20 GB. I recommend you do the same, and make sure that the “Pre-allocate Full Size” stays unchecked.
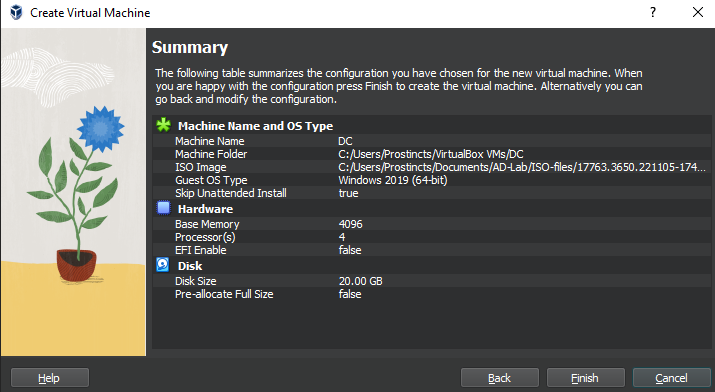
Your summary window should look something like this. After checking the summary, click “Finish”.
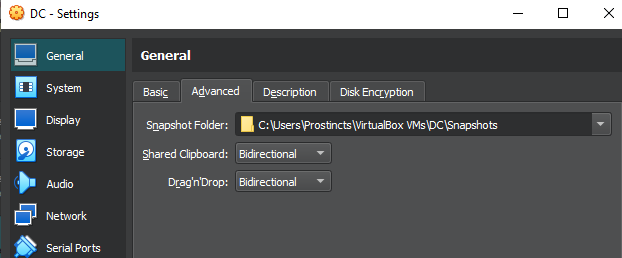
Now we have our Windows 2019 Server ready, but before we start it up, let’s change some settings to allow us to drag and drop items from our real machine into our Virtual Machine. Go to settings in VirtualBox.
Inside the settings, go to the “Advanced” tab and change the “Shared Clipboard” and “Drag’n’Drop” to “Bidirectional”, as shown below.
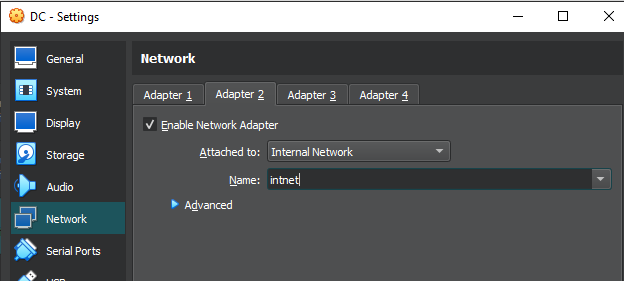
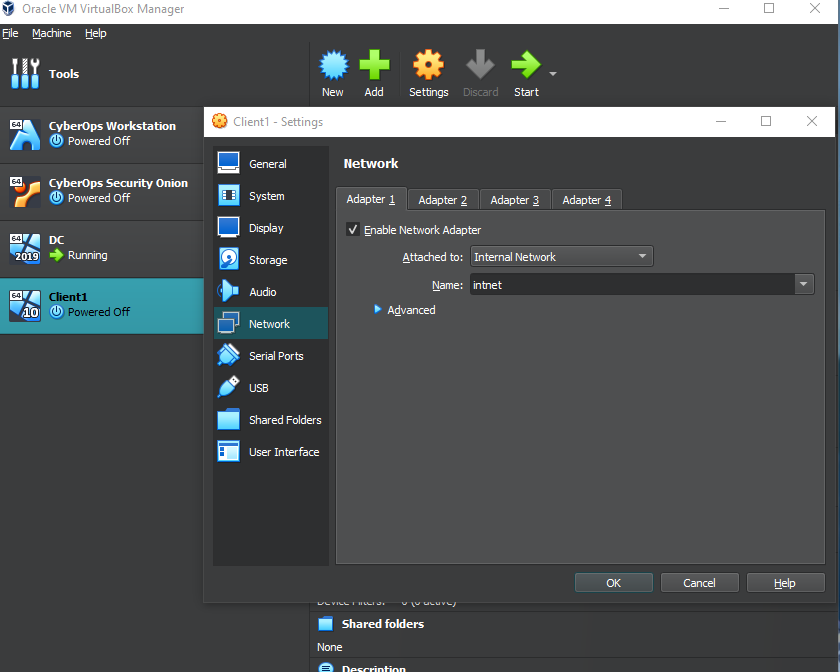
After this, click Network on the left side. We will be on Adapter 1, which is fine as is. But we need to switch to Adapter 2. As shown below, make sure the “Enable Network Adapter” box is checked and that it’s attached to the “Internal Network”. I also changed the name from “DMZ” to “intnet” using the downward arrow on the right. After this, click “OK”.
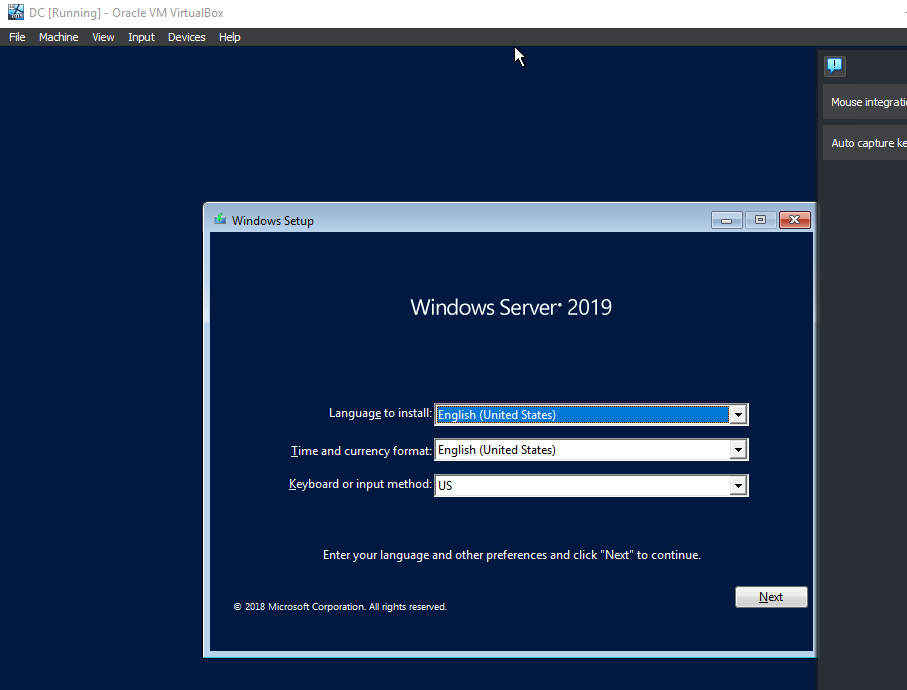
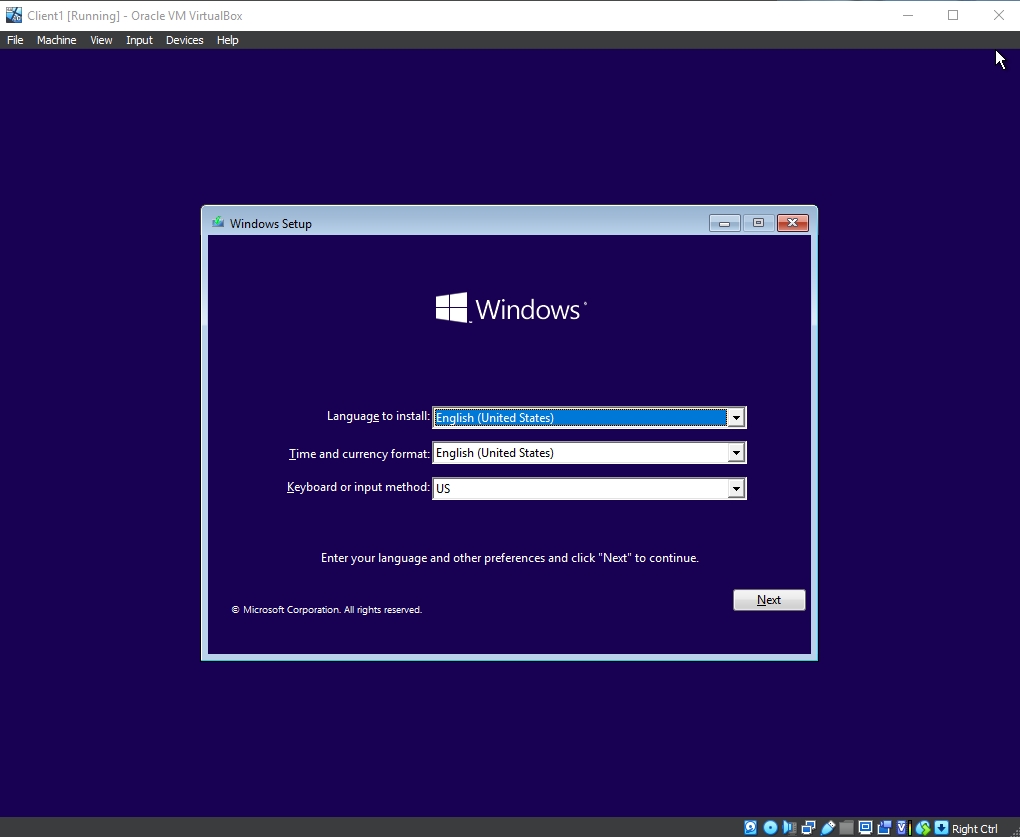
After those network changes, we can click the “Start” button at the top. Once the Virtual Machine has finished starting up, we will see this window. Click “Next”, then in the next window, click the “Install Now” button.
Make sure the operating system you install includes the “Desktop Experience,” then click “Next” and accept the license agreement.

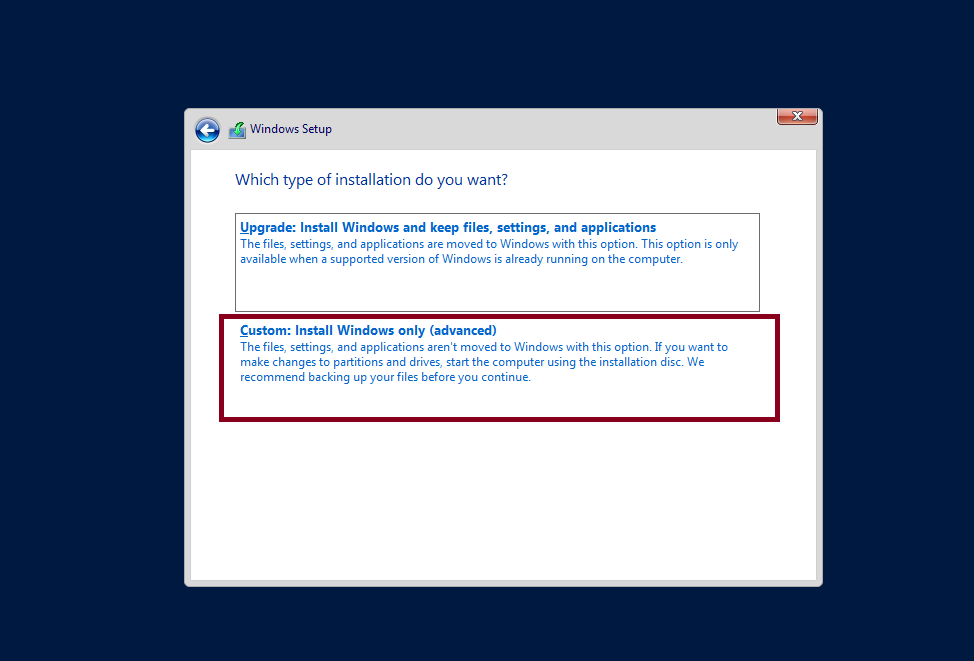
When it asks for the type of installation, click “Custom,” then click Next.
The installation will take a while and restart a couple of times. When asked to “Press any key to boot from CD or DVD.”
Just don’t do it, it isn’t necessary.
Just wait, and Windows will start up on its own.
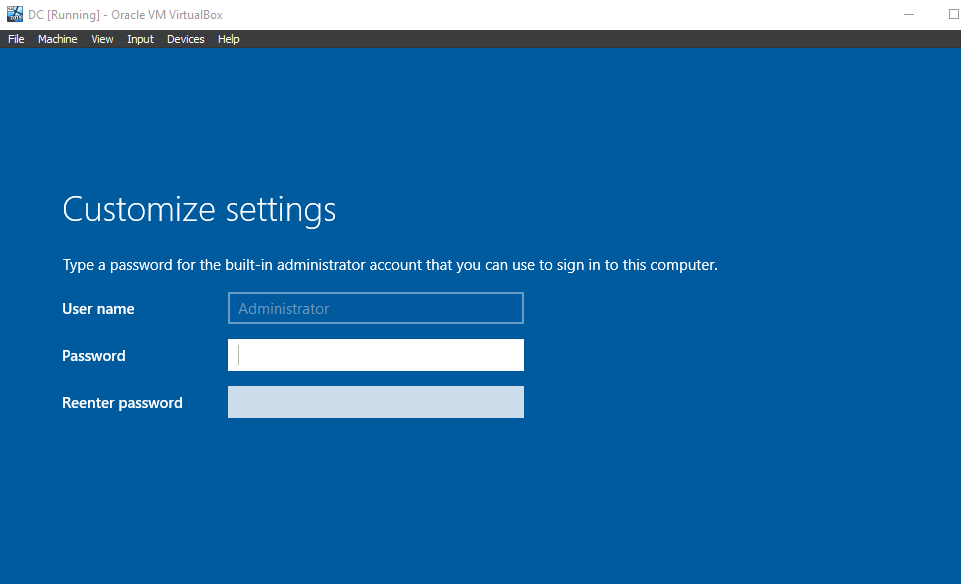
Once you get to the window shown below, then we know Windows is installed. Use a password that will be easy to remember for this lab. Then click finish.
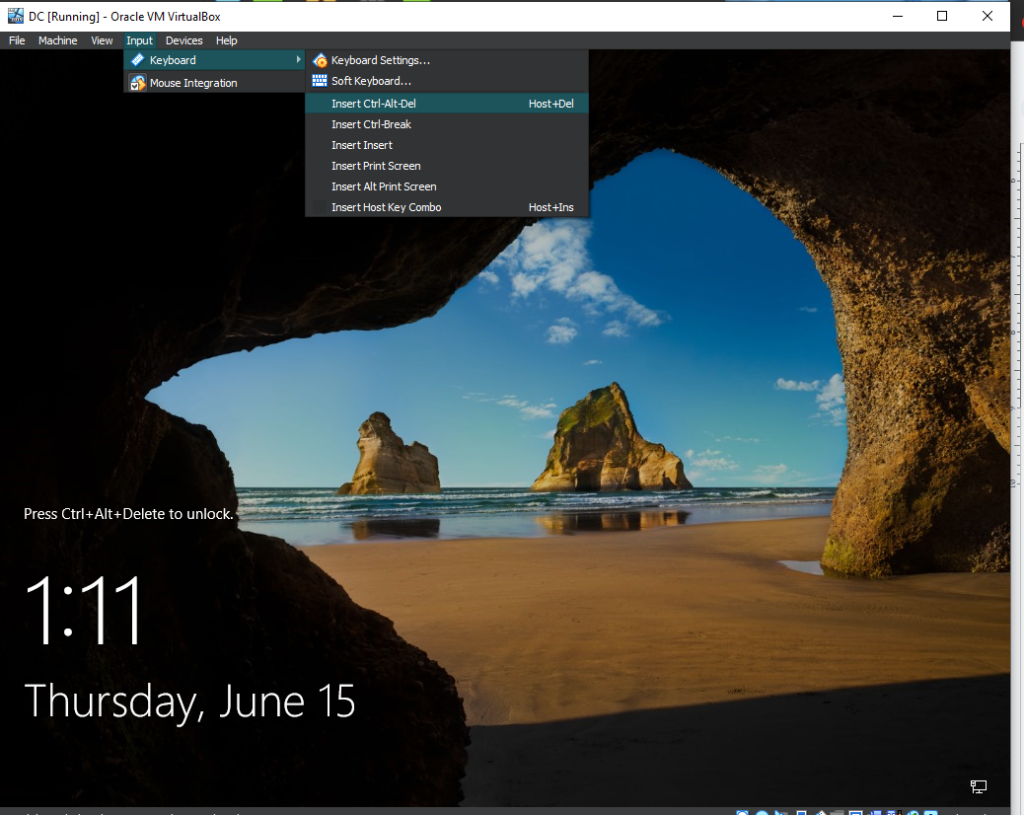
Once you get to the window below, you can send a Ctrl+Alt+Delete using the Input tab at the top of the screen, as seen below. Then log in using the password you entered in the previous step.
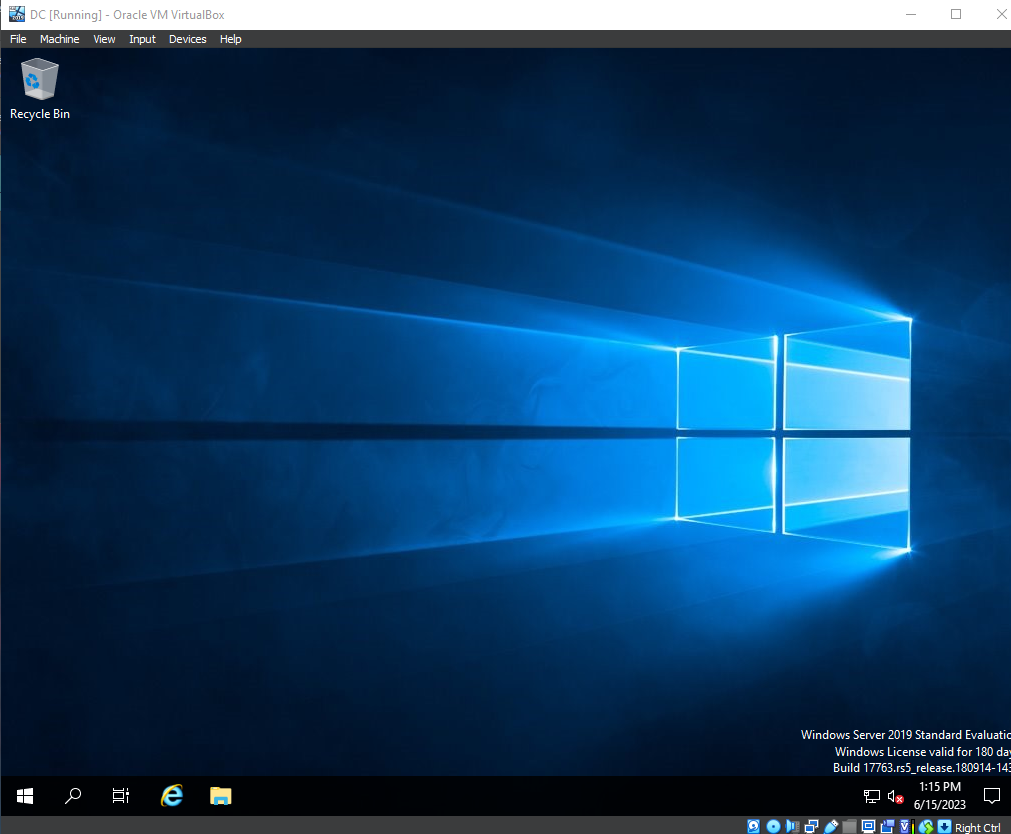
We will then be greeted by the Windows Server 2019 Desktop.
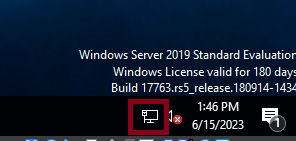
Navigate to the Network symbol at the bottom right of the desktop and click on “Network & Internet settings.”
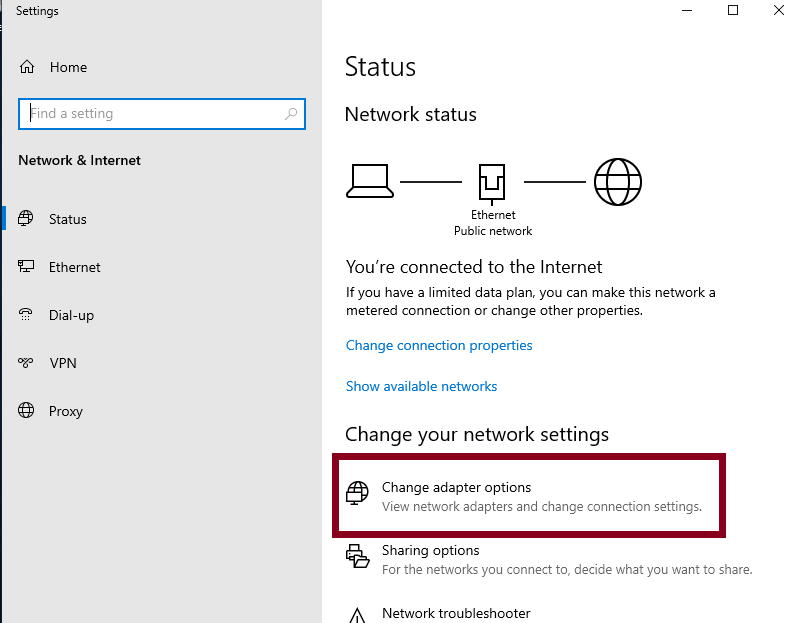
Once those settings are open, navigate to “Change adapter options”.
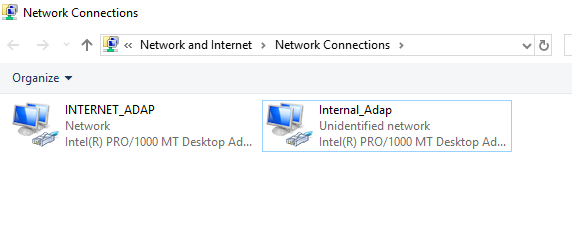
We will find the Internet and Internal adapters that we made in VirtualBox. The one labeled “Network” is the adapter connected to our home network and is NATed. Let’s right-click on it and rename it to “INTERNET_ADAP” and rename the second one to “Internal_Adap”. Giving both of them different capitalization so that we don’t get confused between the two.
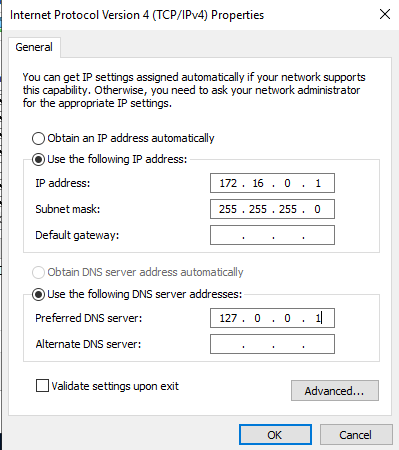
Let’s then right-click on the internal adapter and click on “Properties”. Double-click on Internet Protocol Version 4.
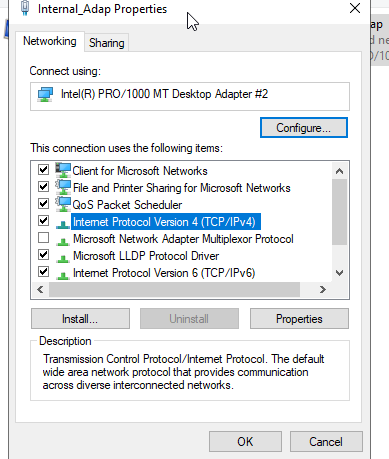
Inside this window, the private IP address of the DC controller for this adapter will be 172.16.0.1 with a subnet mask of 255.255.255.0. We can leave the default gateway empty. For the preferred DNS, we will use the loopback address. This means the Domain Controller will be its own DNS server. Once these changes are made, click “OK” and close out everything else.
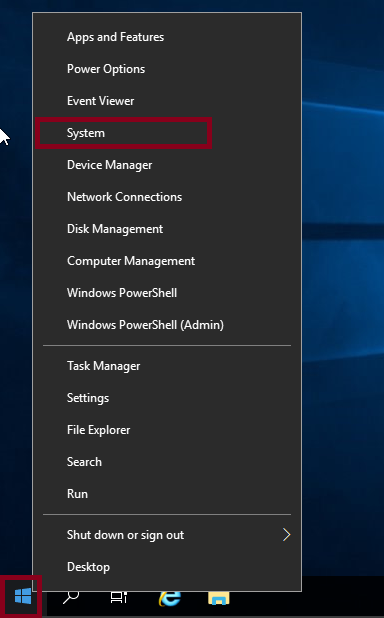
The next step is to change the Server hostname. As shown below, right-click the Windows icon and select “System”.
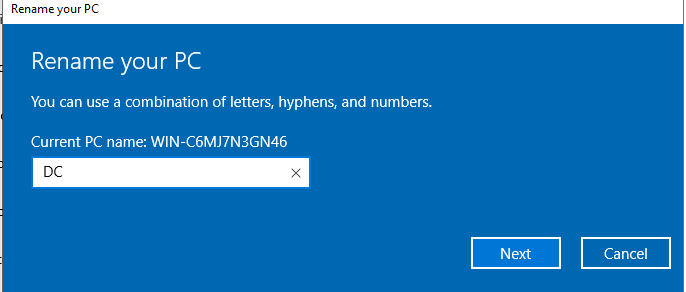
Once the About window appears, you might have to scroll down a bit. Click on “Rename this PC”. As seen below, we can see the current name and input the new name. The name I will use is DC. After entering the name, just click “Next”, then restart now.
Setting up Active Directory
setting up Active Directory services
Once logged back in, the Server Manager should open automatically. But if it doesn’t go to the bottom left, click the search/magnifying glass icon and search for “Server Manager” to open it.
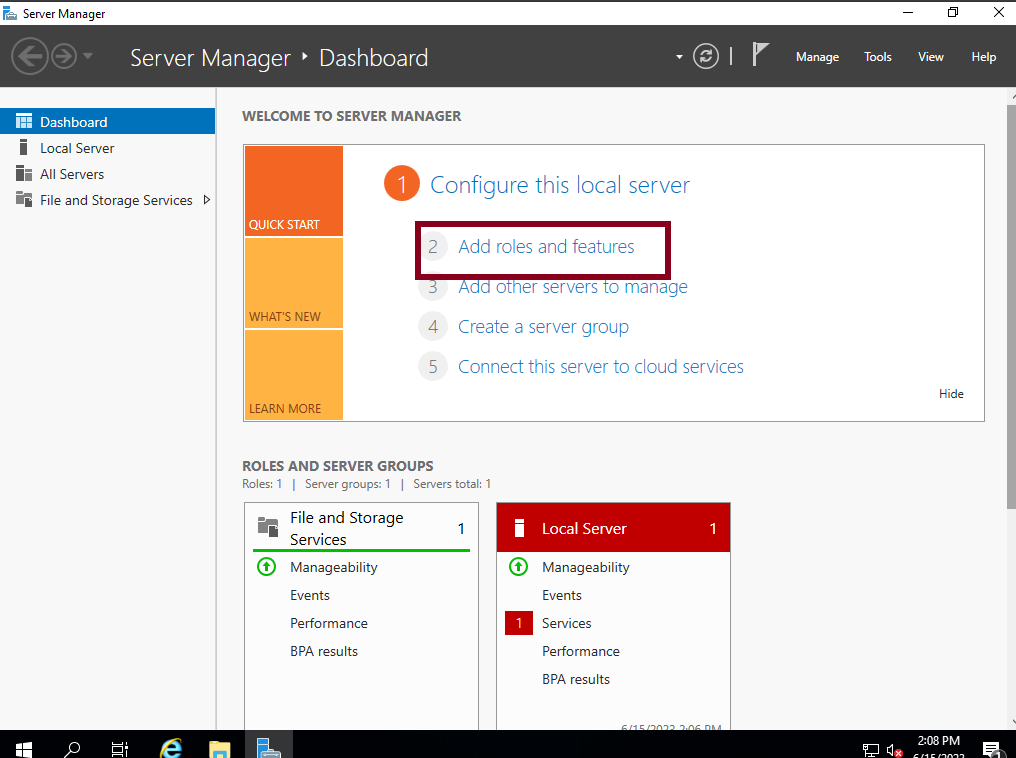
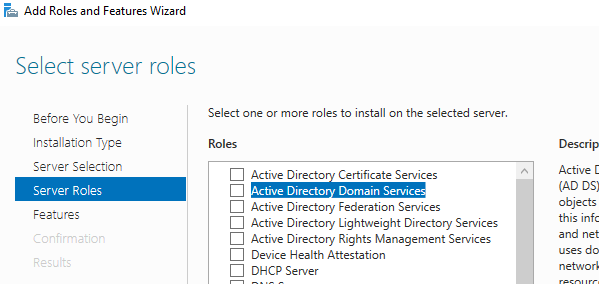
Let’s start working towards setting up the Active Directory now. Inside Server Manager, click on “Add roles and features,” as shown below.
Click “Next” twice until you reach “Server Selection”. This is where we select which device will have Active Directory Services installed. Since we have only the DC Device, there should be only 1 option here. Click “Next”. From the list, select “Active Directory Domain Services” and then add features. Then click “Next”.
For everything else, click “Next”, then “Install” at the end.
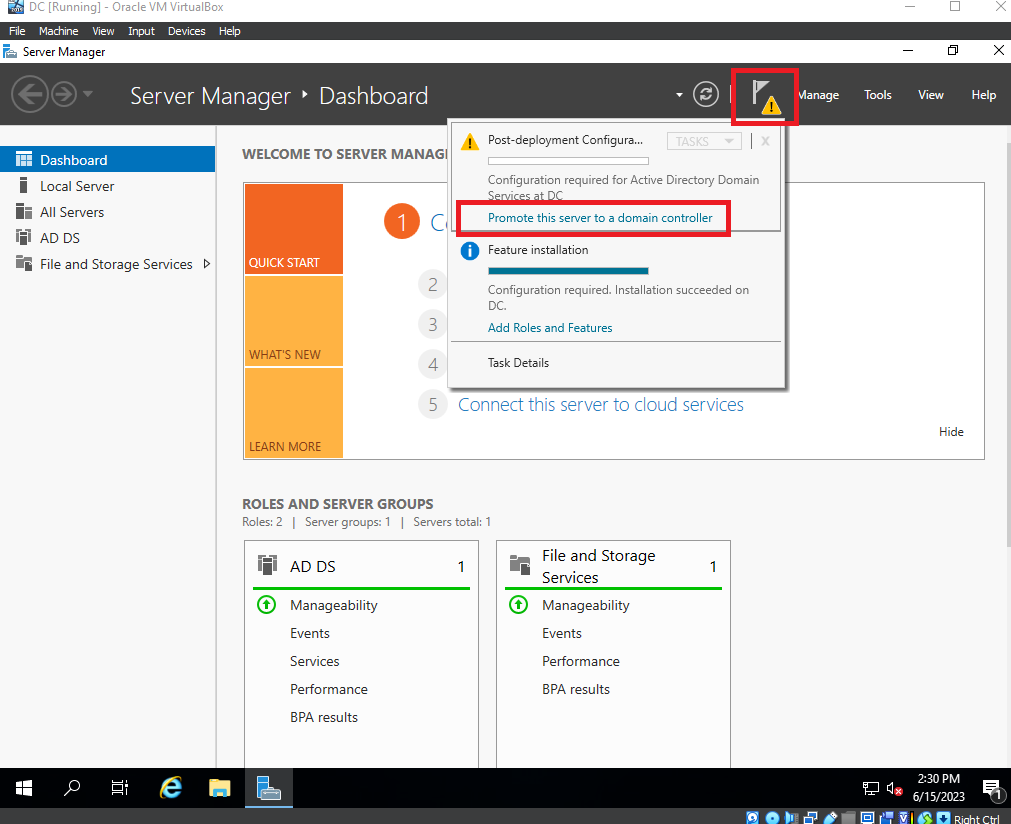
Wait for the installation to finish. It should say “Installation succeeded on DC” below the progress bar once it’s done. When you see that, you can close the wizard window.
Once back in the Server Manager, a yellow symbol will appear in the top right. This indicates that we still need to configure the Active Directory Domain. Click the symbol, then click “Promote this server to a domain controller,” as shown below.
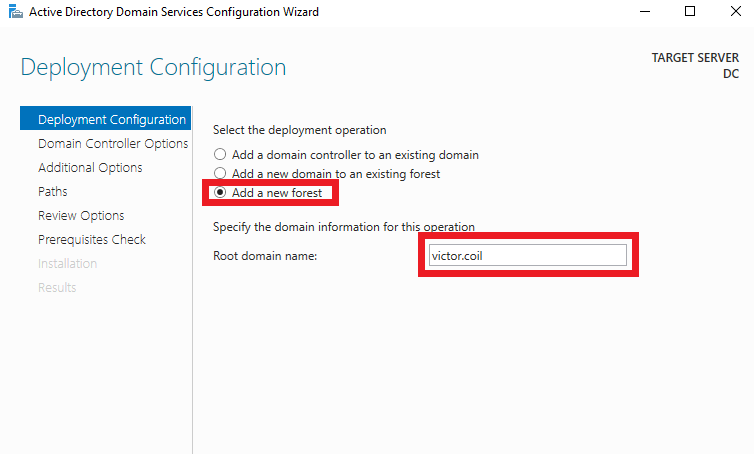
After clicking that, select “Add a new forest”. For the root domain name, you can use something like “mydomain.com” or, since this is a lab, your name as shown below. After resetting, click “Next”.
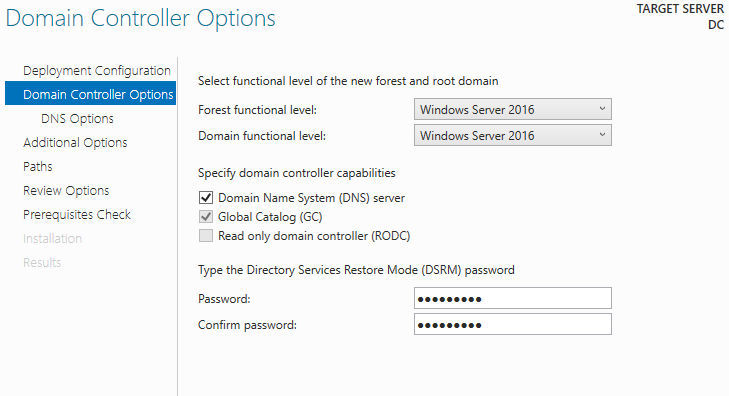
For the password in this lab environment, I will use the same one I used for the administrator account. Then click “Next”.
Keep clicking next until you can install it. Once the installation is complete, the server will restart automatically.
After the new computer settings are applied, we’ll be able to send a Ctrl+Alt+Delete. Once it’s sent, we can see that our domain will appear on the left side of the Administrator account.
Let’s create a Domain Admin Account so that we don’t keep using the Administrator Account for this Server.
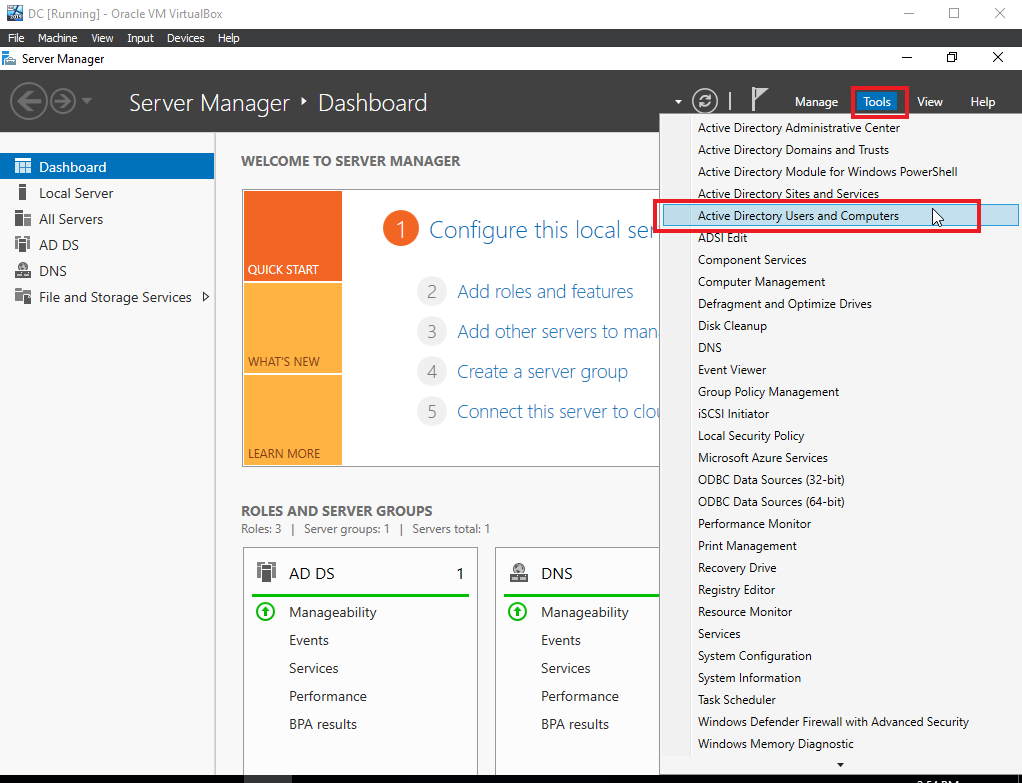
Once logged in, the server manager should open up automatically. Navigate to “Tools” in the top right, then in the drop-down menu, click “Active Directory Users and Computers”.
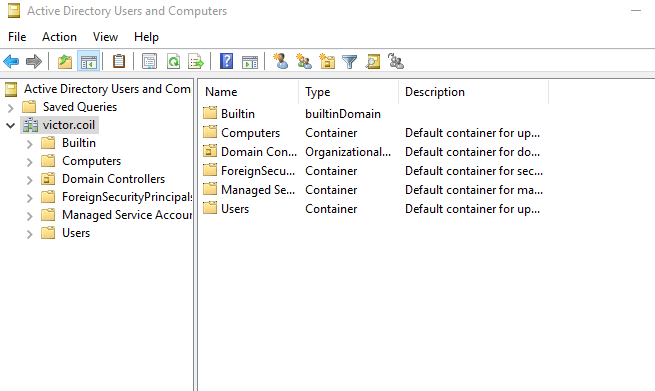
We will be able to see our freshly made domain.
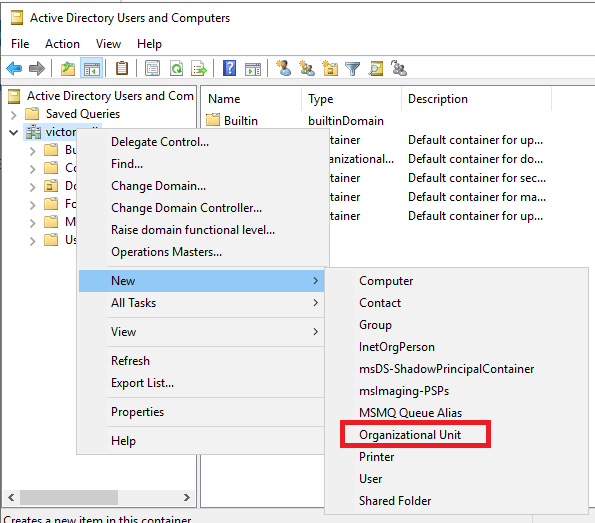
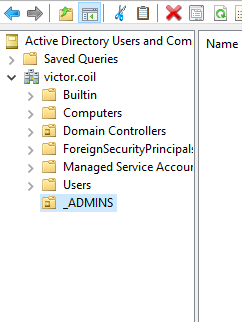
Right-click on the domain name, in this case, for me, it will be “victor.coil”. In the drop-down menu, hover over “New” and select “Organizational Unit” as seen in the picture below.
In the new Object Window, I set the name to “_ADMINS” and unchecked “Protect container from accidental deletion”.

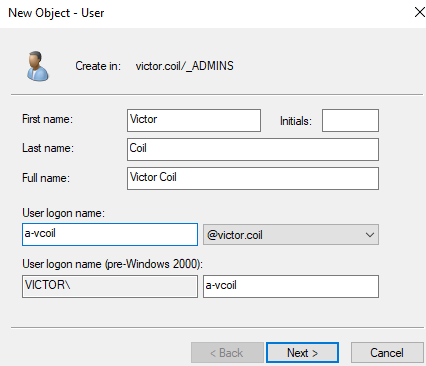
The new Organization Unit will appear on the left side under our domain. We can then right-click on the newly created ADMINS folder and select New -> User
The image below shows what I entered in the New User window. The “a” in the username is just a way to know that it is an “admin” account. After inputting your information in this window, click “Next”.
The next window will prompt us for the user’s password. I will use the same password that I’ve been using for this lab.
I unchecked “User must change password at next logon,” checked “Password never expires,” clicked “Next”, and finished.
We will be able to see the new user inside the ADMINS folder.
Right-click on the user, click on “Properties”, at the top click on the “Member Of” tab, and inside this tab click on the “Add” button.
Inside the “Enter the object names to select” box, type in “Domain admins” and click on “Check Names” on the right. It will put the correct object in the box. Then click “OK”, then “Apply”, and “Ok” again.
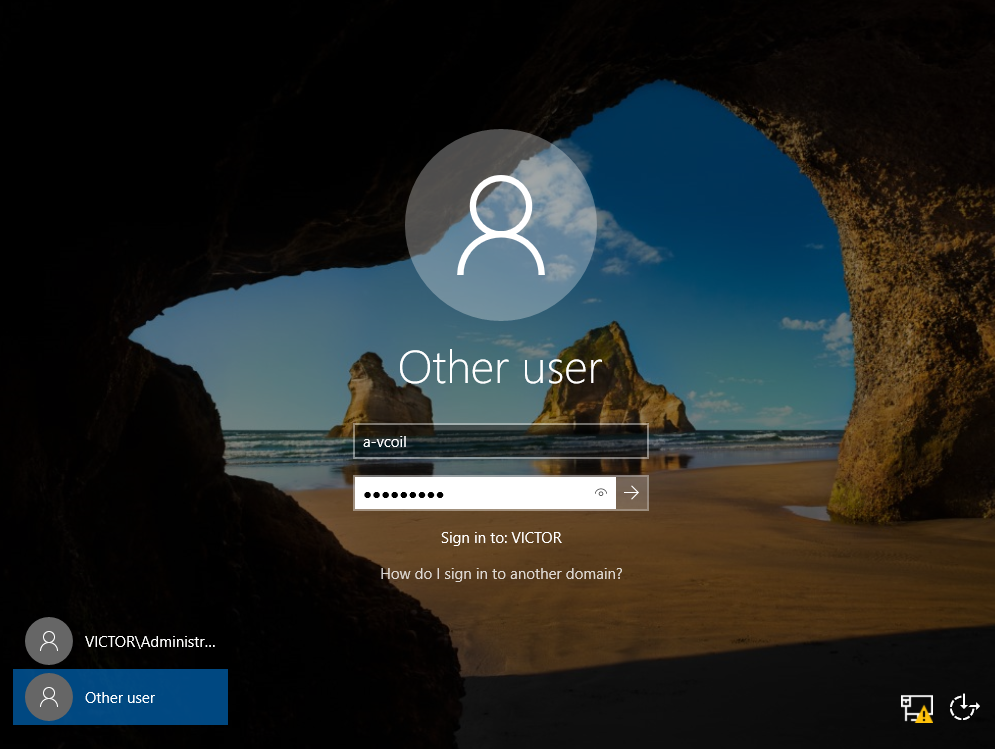
Now we have a proper Domain Admin Account. We can test it by closing everything and signing out of the current administrator account.
After sending a Ctrl+Alt+Delete, instead of signing in to the administrator account, navigate to the bottom left, where it says “Other user”. Plug in the credentials of the User we created under our Domain.
In the Domain Administrator Account, the server manager will reopen once logged in.
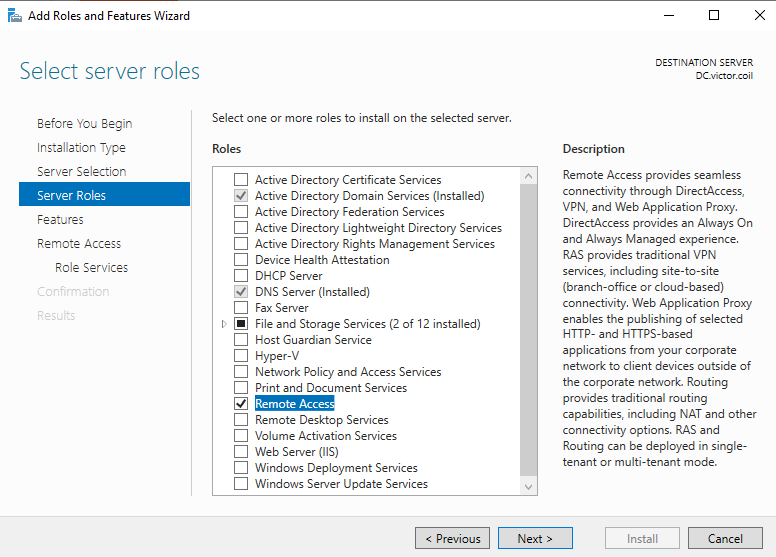
Navigate to “Add Roles and Features” once more. Keep clicking “Next” until you reach Server Roles, then select “Remote Access” as shown below.
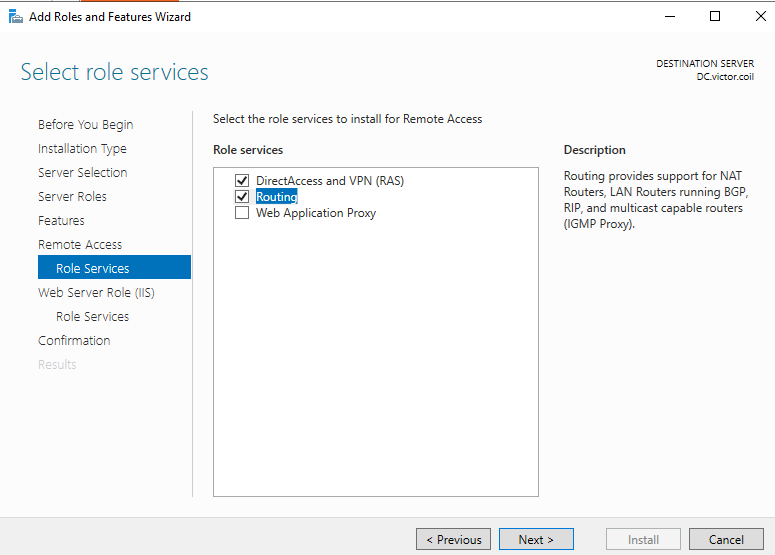
Keep clicking “Next” until you reach “Role Services”, and select “Routing”. Click “Add feature”. This will also select DirectAccess and VPN(RAS), which is fine. Keep clicking “Next” until you reach the confirmation screen. Once there, click “Install”. Once installation is finished, close the wizard window.
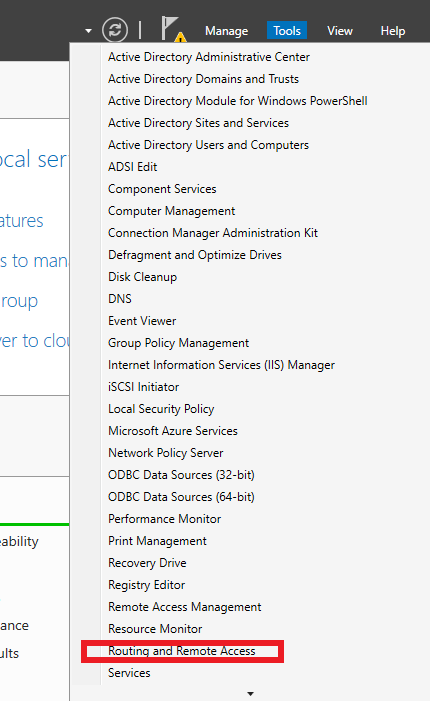
Once back in the server manager, navigate to tools and click on “Routing and Remote Access”.
Right Click on “DC (local)” and select the top option as seen below.

Inside the Routing and Remote Access Wizard, click “Next”, then make sure NAT is selected on the second window.

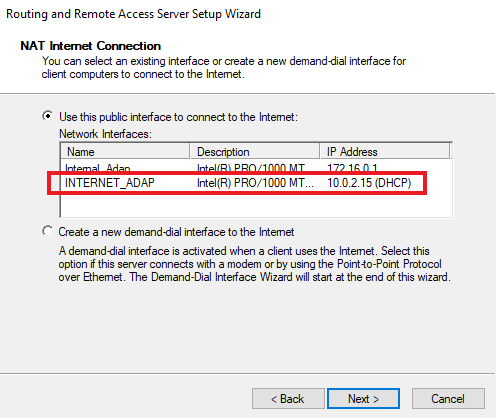
In the Window shown in the image below, if you don’t see adapters in the little box, click “Cancel”, close the Routing and Remote Access window, then open it again through Server Manager. This little bug also happened to me during this, but this seemed to do it. It should look like the image below.
Select the Internet Interface for this step, then click “Next”, and “Finish”.
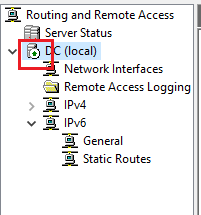
You know it’s up and configured when you can see a little green arrow next to DC (Local) in the Routing and Remote Access window.
Setting up DHCP on AD
DHCP will give an IP address to clients in the environment
We will be setting up a DHCP server on the 2019 server.
In the server manager, select “Add roles and features” and click next until you are at “Server Roles”. In the list of roles, select “DHCP Server” and add the feature. Then keep clicking next until you can install. Once installation finishes, close the wizard window.

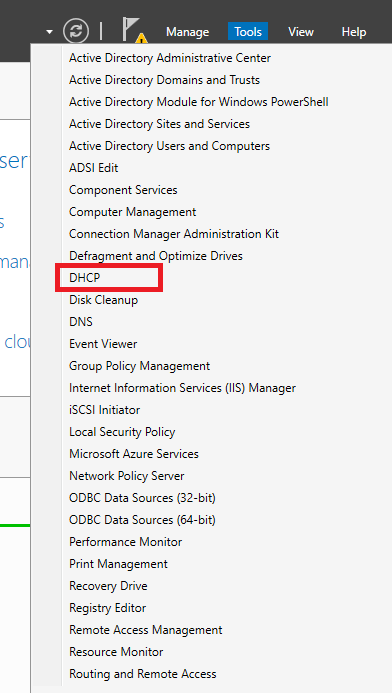
Inside Server Manager, navigate to tools and select “DHCP.”
Once the DHCP Window opens, right-click IPv4 and select “New Scope,” as shown below.

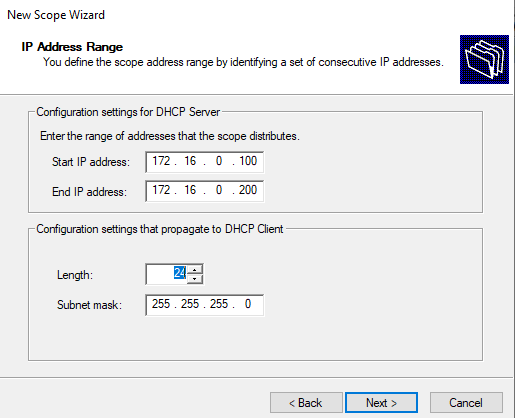
In the newly opened wizard, click Next. For the scope name, I used “172.16.0.100-200”.
The image below is what I input for the scope.
Once in the exclusion and delay window, you can just click next. Same for lease duration, for this lab environment, we can leave it at 8 days. Then, “Yes, I want to configure these options now.”
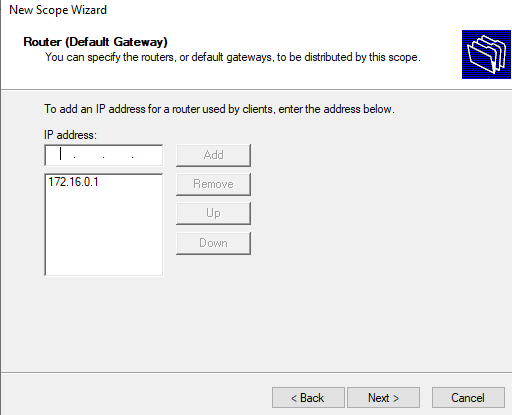
As shown below, use the DC’s IP address. Don’t forget to click the Add button.
For the Domain name and DNS Servers window, click Next. Same with the WINS window, click next. Then keep the “Yes, I want to activate this scope now” checked, click next, and finish.
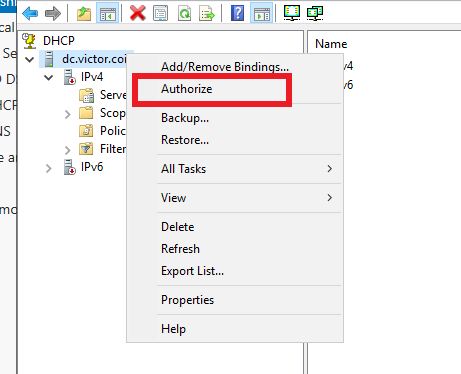
After this, right-click on the DHCP server on the right and select Authorize, as shown below.
You can also right-click on IPv4 and select Refresh. You will see a little green checkmark appear. This tells us that the server is up.
Automating with PowerShell
automating the creation of 200+ user accounts
In Server Manager, click “Configure this local server”; it’s the option above “Add roles and features”.
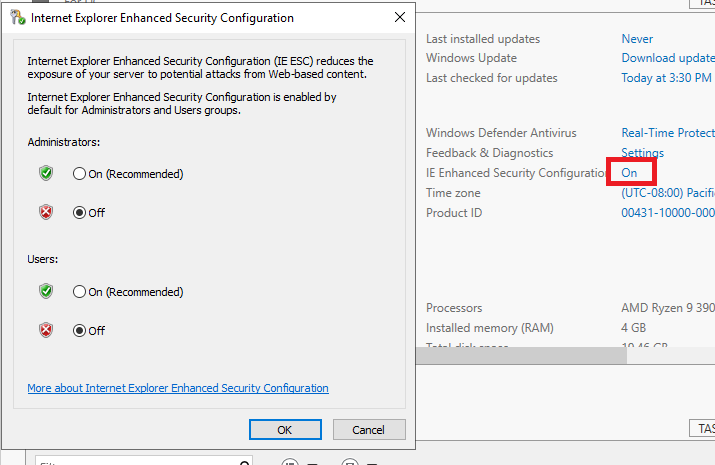
As shown below, click where the Red box is shown and turn off both settings. This will allow the Domain Controller to browse the web more easily. Don’t do this in a production server.
After this, click OK, then open Internet Explorer.
If the window to set up Internet Explorer 11 appears, just click on “Ask me later.”
Then copy and paste the link below into the URL search bar.
https://github.com/joshmadakor1/AD_PS/archive/master.zip
Once you click the link, click the arrow next to Save at the bottom, then click Save as. I saved the .zip file on the desktop. Once there, just double-click on it and drag the folder inside the zip onto the desktop.
This will download a script that takes a .txt file with names and creates user accounts in Active Directory. The zip file already comes with a list of 1000+ names. You can open the text file and delete a big chunk if you want fewer users. In my lab environment, I kept only 200 names in the TXT file and added my name at the top.
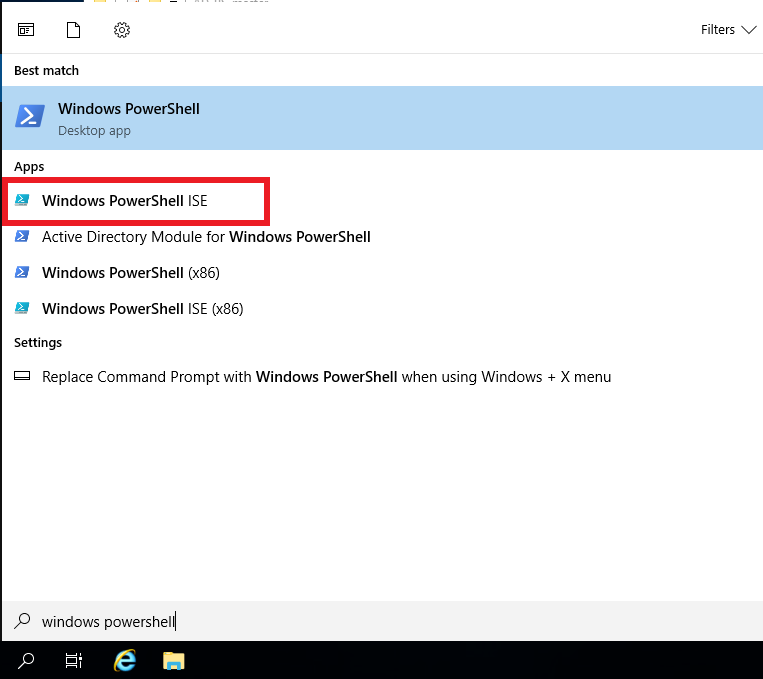
After saving the changes to the .txt file, navigate to the magnifying glass at the bottom left and search for Windows PowerShell ISE. Right-click on it and run it as administrator. Click yes on the pop-up window.
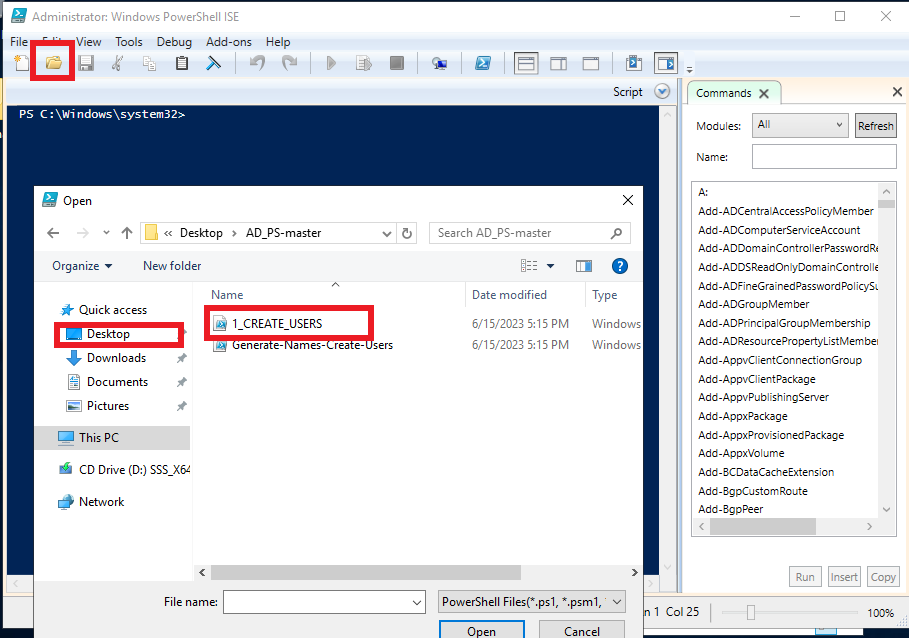
Inside PowerShell, on the top left, there is a little open folder button. Click on that, then navigate to Desktop, into the folder that we pulled out of the zip file, and inside click on the 1_CREATE_USERS file
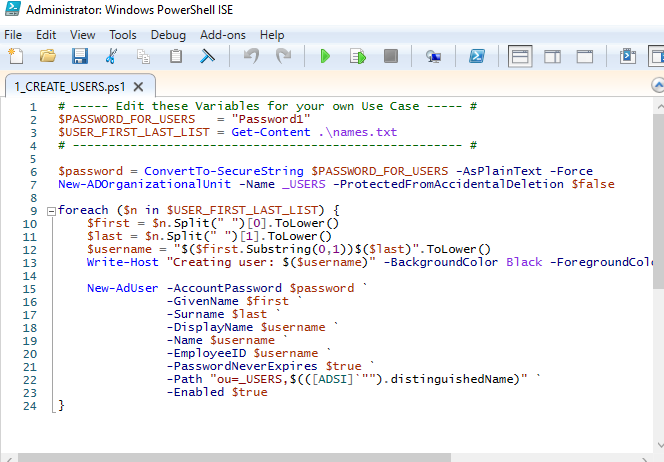
Below is an image showing the script contents.
Before we run the script, we have to run this command first.
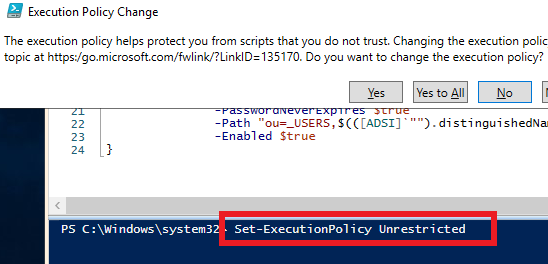
There will be a pop-up; click Yes to All.
We will also have to change the directory to the location of the script and text file. So, for me, I had to run the command below.

Once there, we can click the green arrow at the top of PowerShell. Once run, there will be a pop-up warning you about only using scripts that you trust. Just click Run once.
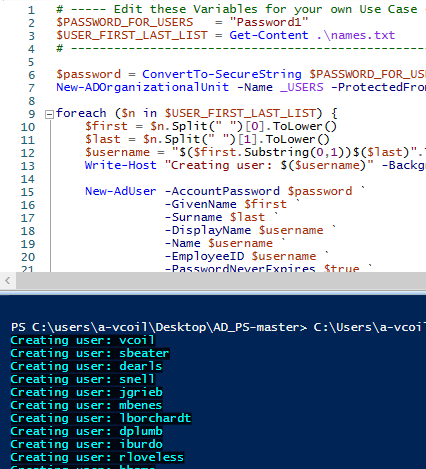
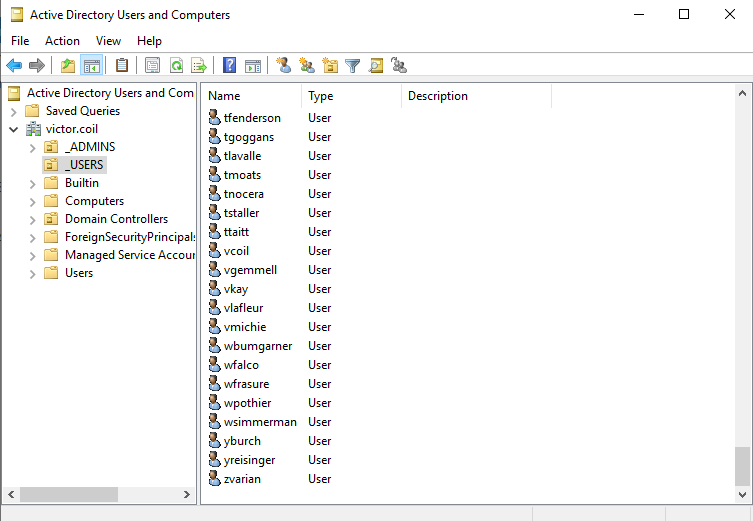
You will see users being created in the bottom PowerShell window. We can also confirm this further by opening Server Manager, navigating to Tools, and clicking on “Active Directory Users and Computers”.
Under our Directory, a folder named “_USERS” will be made, and inside will be the user accounts that were created.
Deploying Windows 10
It can test if our environment is working
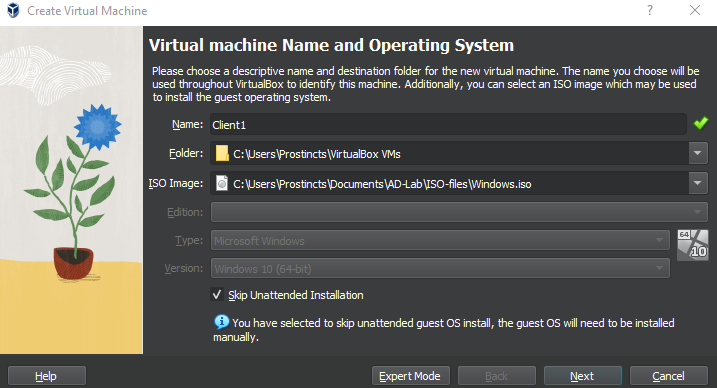
Now, to create the second Virtual Machine. The name is Client1. I didn’t change the folder path, and I selected the Windows 10 ISO Image file we downloaded at the beginning. After this, click next.
As mentioned before, 4 GB of RAM and 4 CPU Cores are used.
As for space, 60GB was selected. This space will be needed for future labs. Click next and finish.

After that, make sure Client1 is selected, then click Settings at the top. Navigate to Network and instead of NAT, change it to Internal Network. With the name being “intnet” instead of “DMZ”. After that, click OK and start the virtual machine.
Once at the window below, click Next, then Install Now. When the “Activate Windows” window appears, click “I don’t have a product key” at the bottom.
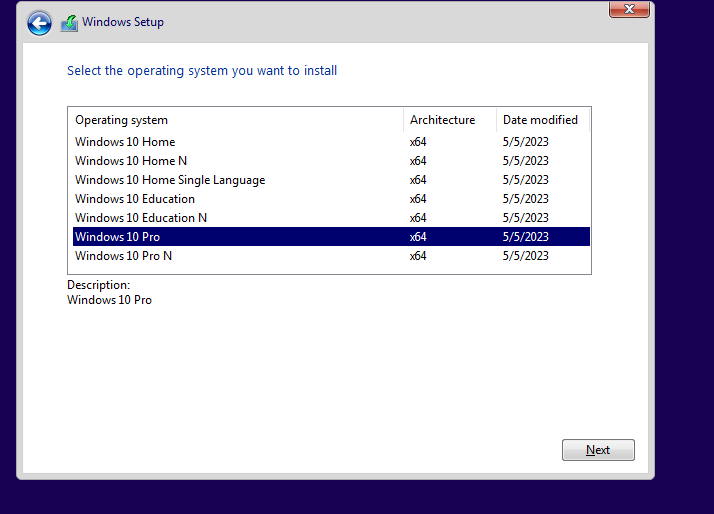
For the operating system, select Windows 10 Pro, and accept the licenses.
For the installation type, select Custom. Then select next. The installation will take a bit and the virtual machine will also restart a couple of times.
Again, do not press any key when it asks you to.
Once the screen below appears, just click yes. Then yes for the keyboard window. After that, skip.
If it asks you to connect to a network, click on “I don’t have internet” at the bottom left.
You may be told there’s more to discover when connected to the internet. Click on “Continue with limited setup.”
If asked what setup you’d like, click on personal use.
Just keep it offline and a limited setup.
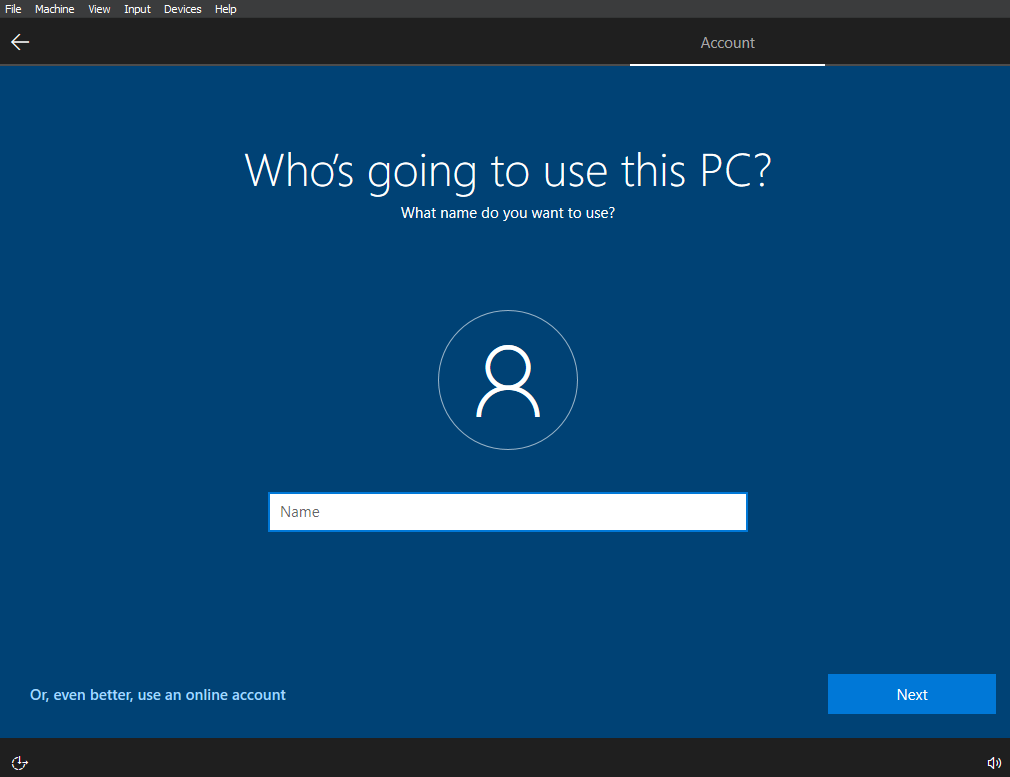
Once on the screen below, you can just use “User” and click Next. The password can just be blank.
Once in the privacy settings, just turn everything off.
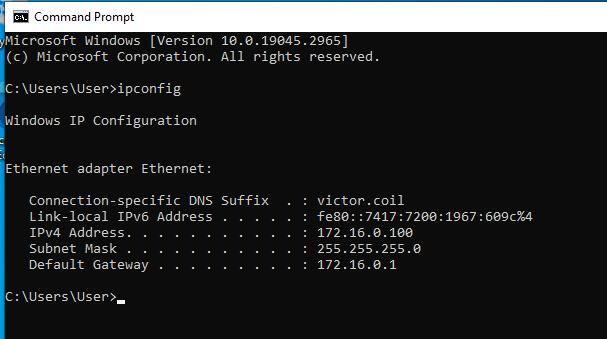
Once inside the Windows 10 virtual machine. I opened the command prompt and ran ipconfig. As seen below, the IP address of Windows 10 is 172.16.0.100, and the Gateway is 172.16.0.1, which is the Windows 2019 Server.
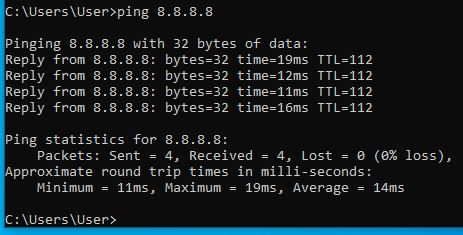
We are also able to ping Google, which means our infrastructure works, as does the NAT we set up on the Domain Controller.
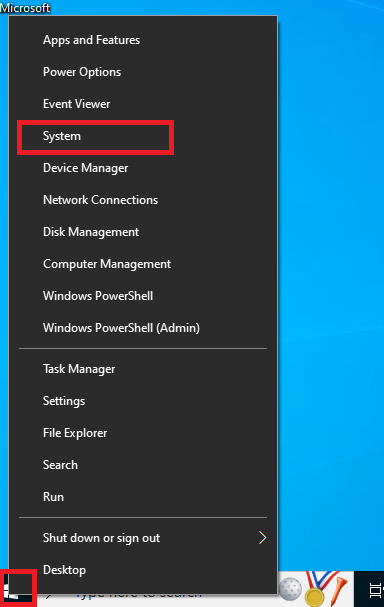
Let’s rename the Windows 10 virtual machine and join it to the domain. Right-click the Windows button in the bottom-left corner, then click System.
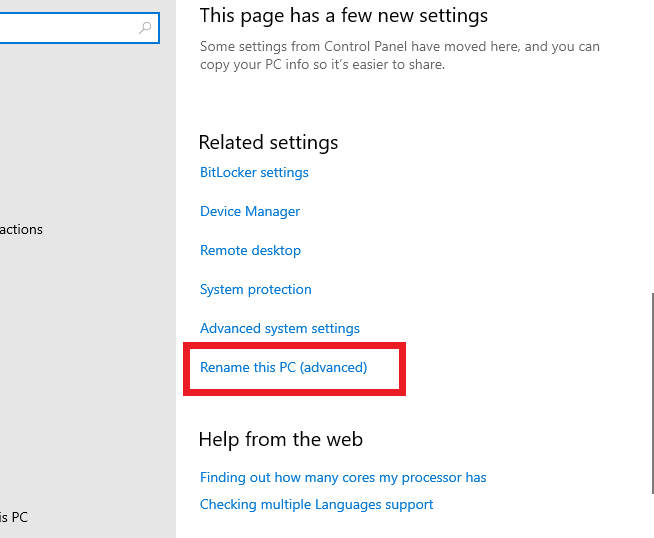
Once in the About Window, scroll down until you see “rename this PC (advanced)”
You can ignore everything and just click on the change button shown in the image below.

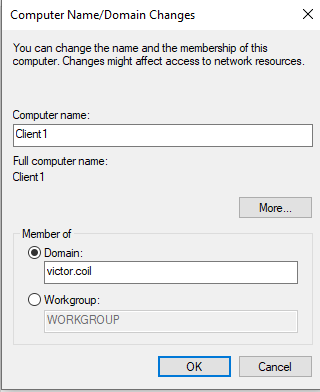
In the new name change window, you can place the new name of the machine and the domain that it will join. Below shows that I picked the name “Client1” and the domain name victor.coil. It then asked to log in with an account that is under that domain. I logged in with “vcoil”. An Administrator account is not needed.
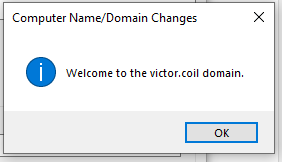
After entering the correct credentials for an account under the domain we created. The following message will appear. Then you’ll have to restart the Windows virtual machine.
We can further confirm that the Windows 10 Computer is in the domain by checking on the Domain Controller.
With Server Manager open, navigate to Tools -> DHCP
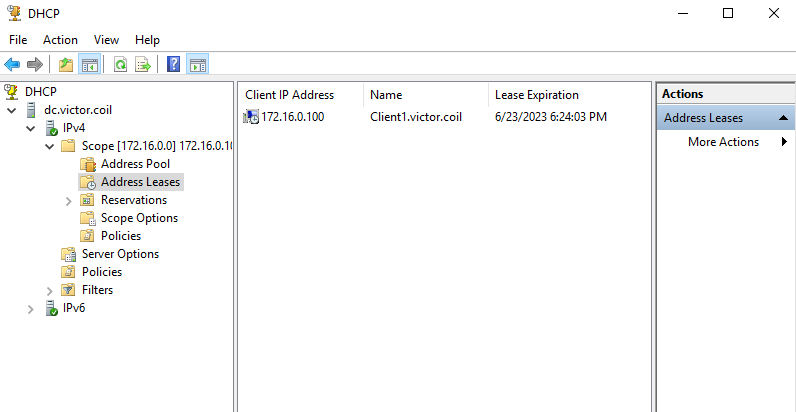
The newly renamed computer will appear within the DHCP scope we created.
That concludes the lab.