
Deployment
Deploying Wazuh onto Active Directory
Heavy Resources
The DC VM, Client1, and the Wazuh server will be using 10-12 vCPU, 12 GB of RAM, and 110 GB of storage. I will make a separate document that covers Wazuh using Linode so that the lab environment isn’t too resource-heavy.
If you have 20+ Logical Processors and 32 GB of RAM, this lab can be easily done without Linode.
Lab Brief Summary
This lab will cover the deployment of a Wazuh Server onto Active Directory. It will guide you through adding agents to Wazuh, using the CIS Benchmark tool to ensure compliance, and configuring the File Integrity monitor to detect integrity violations on user desktops. Additionally, the configuration of the vulnerability module will be covered at the end.
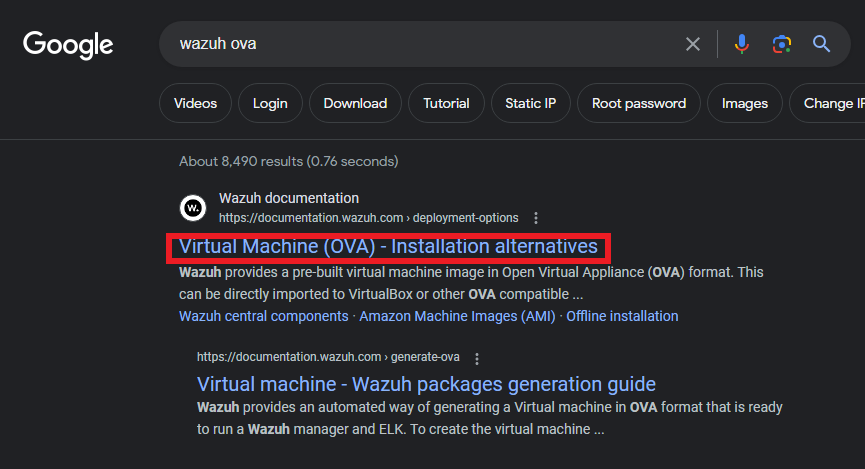
Now to get started with this lab we need to get the Wazuh OVA.
We can obtain it by either searching for “wazuh ova” on Google (or your prefered browser) and clicking on the first result as shown below or simply follow the link provided above.
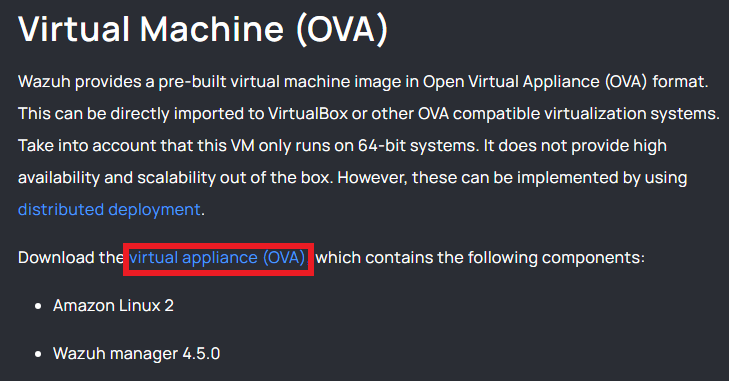
Once there, click on the “virtual applicance (OVA)” link as shown below.
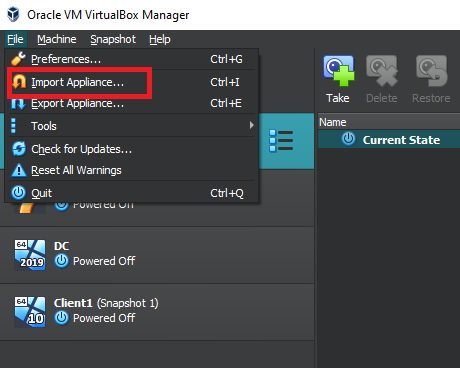
Save the OVA file in a location that you can easily recall. Then, open VirtualBox and go to the “File” menu at the top left corner. From there, select “Import Appliance”.
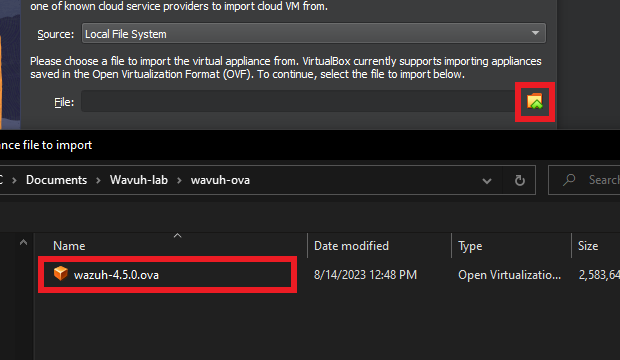
Click on the little folder with the green arrow to browse to the location where you saved the OVA file and select “Open”.
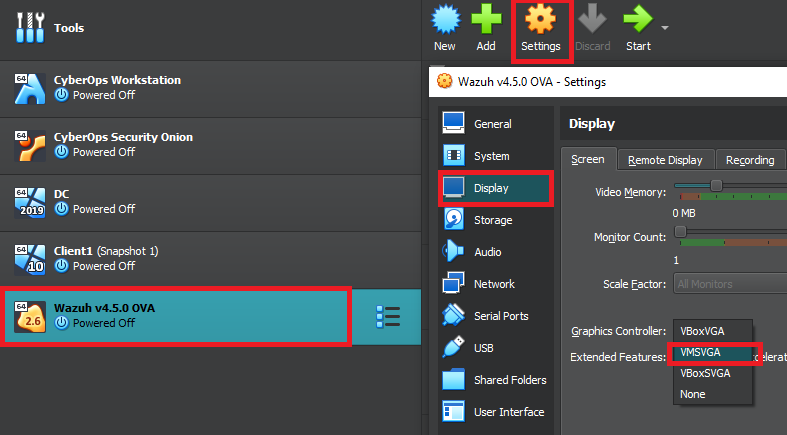
In the application settings, leave everything as default, then click “Finish”. After importing the OVA, ensure that the Wazuh VirtualBox is selected and click on “Settings” at the top.
Inside the newly popped up settings window, click on display on the left hand side, and change the Graphics Controller to “VMSVGA” as shown in the picture below. The official documentation brings up that we have to change the graphic controller settings to VMSVGA or else the Virtual Machine may start crashing on us.
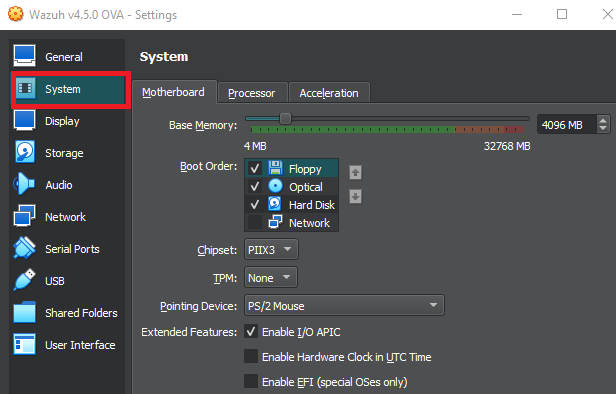
The recommended configuration for 1-25 agents/clients is 4 vCPU, 8 GB of RAM, and 50GB of storage. I will be using the 4 processors, and the 50 GB of storage, but bump down the RAM to 4 GB (4096). Dependiong on your setup, you can do the same or you may be able to bump down the processors to 2 instead of 4. You can change these settings under the “System” tab.
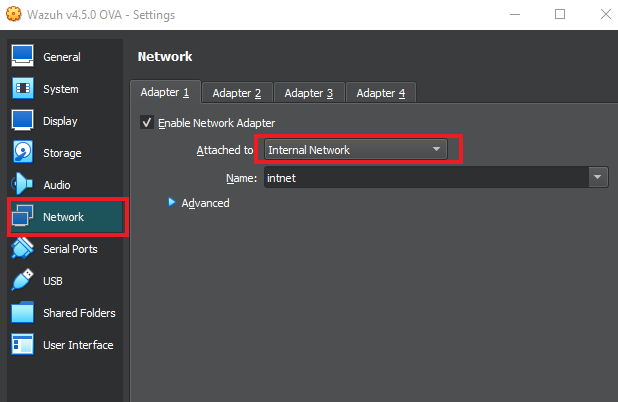
Then go to the “Network” tab and make sure that the network adapter is on the “Internal Network” with the name “intnet”.
After that, go to “General” and put the shared clipboard and Drag’n’Drop to “Bidirectional.”
At this point, make sure that the DC virtual machine is “on” so that the Wazuh server can get an IP address.
I used the domain admin account to log in, which was in the “a-XXXXX” format.
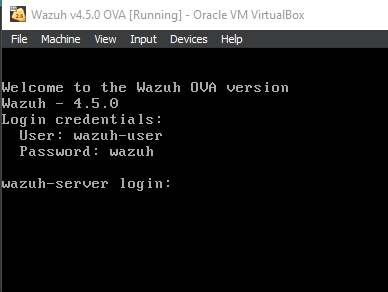
Once the DC VM is on and running, start up the Wazuh Server VM.
It might take a bit for it to start up. Once you see the screen shown below then you’re all set. Log in using the credentials shown.

You can do a “sudo -i” to change to the root account.
We’ll need to know the IP Address to access the Wazuh website.
It’ll be very easy to know if you have an IP, as there will be logs that appear on the console that basically says that the time is being synced up. But you can check by running an “IP a” command on the Wazuh Server or checking on the Domain Controller, inside of the “Server Manager” -> “Tools” ->”DHCP” then look for “Address leases”.
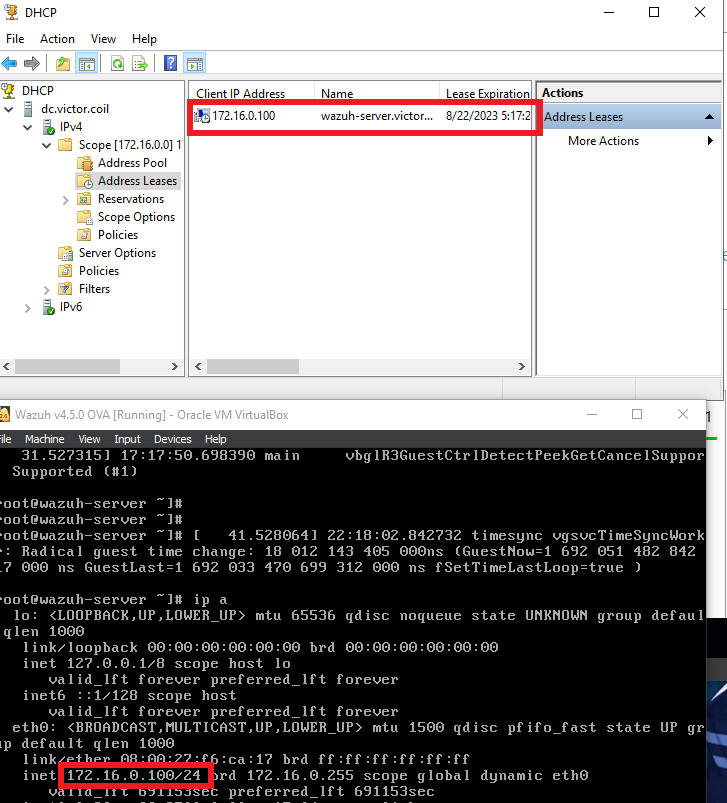
The IP addresses seem to match up.
I also started up the Client1 Machine and logged in using the same account from the DC machine.
Once logged in, open up Microsoft Edge (or Chrome, or just any browser of your choosing) then navigate to “https://<WazuhIP>” just as seen below.
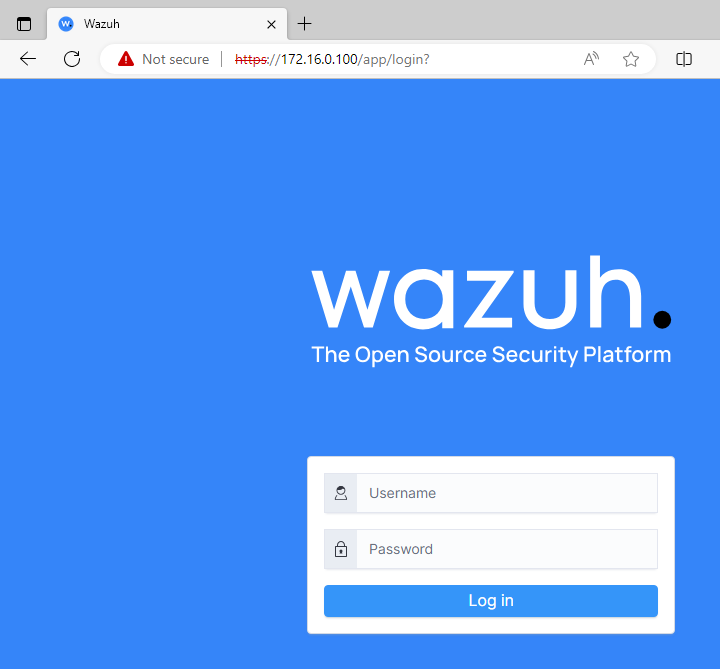
The user and pass for this page is “admin:admin”. Once everything is done loading, you’ll be greeted with the dashboard.
Adding Agents
Adding Agents onto the Wazuh server
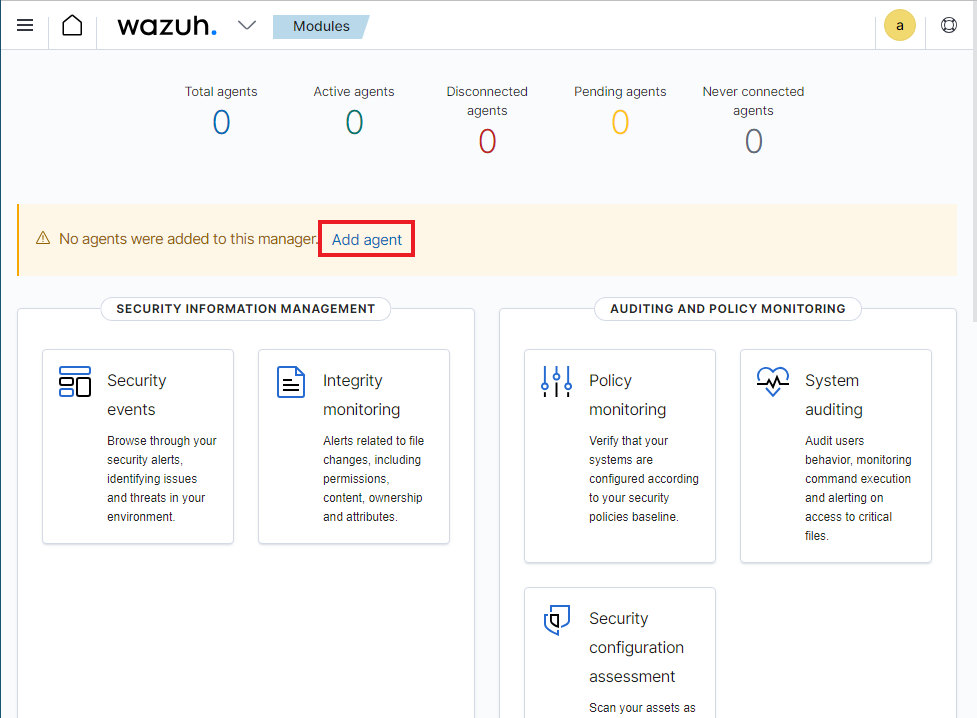
Let’s add the DC and Client 1 machines as agents so that we can explore Wazuhs functionalities. Click on Add agent.
Inside of the new agent menu, click on WIndows, Windows 7+, and the last option should be auto selected. Then for step 4, since the wazuh server is in the internal network we can just do the IP address.
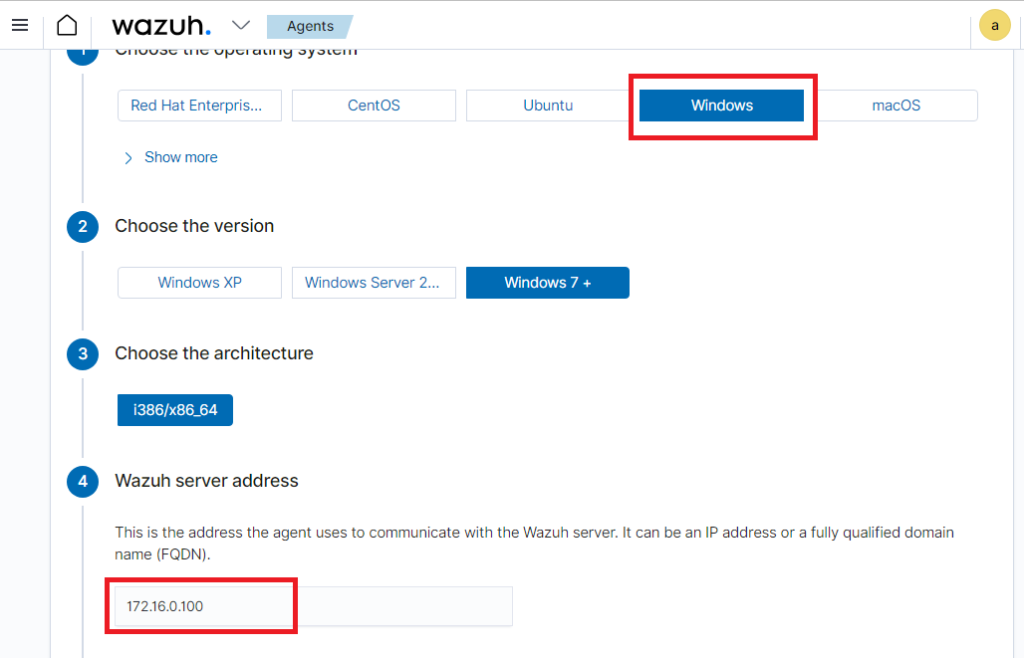
For step 5 I named the agent “Client1-VC” and clicked on the default group.
While keeping the page open, search up PowerShell at the bottom left and run it as administrator. Click on yes if it asks if you want powershell to make changes to the system.
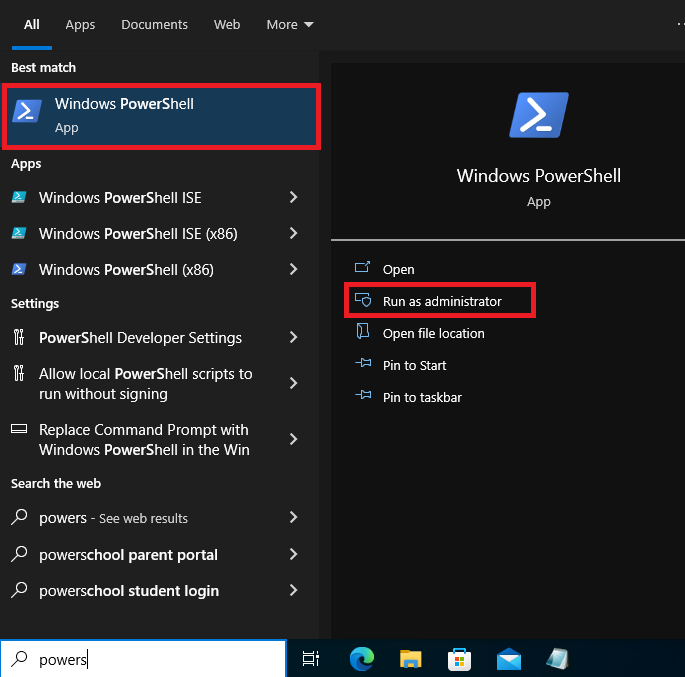
For step 6, click on the PowerShell command to copy it and paste it on the Powershell window. It will say that the service has started successfully once done running.
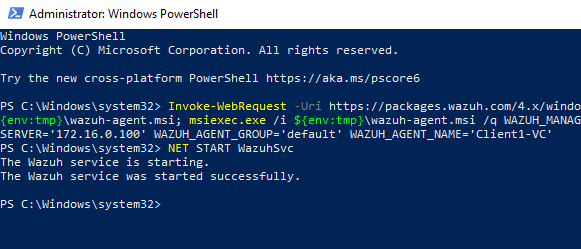
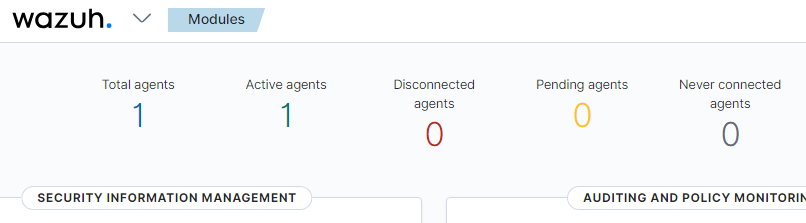
We can head back to the dashboard and reload the page to confirm that the agent is active. Which seems like it is.
Compliance Support
Wazuh can be used to support compliance
This section will do a quick glance over of the agent dashboard and go over how the CIS Benchmark tool can help support organizations to become compliant with industry standards and laws.
We can then click on the “1” below either the total or active agents.
Scroll down and click on the actual agent.
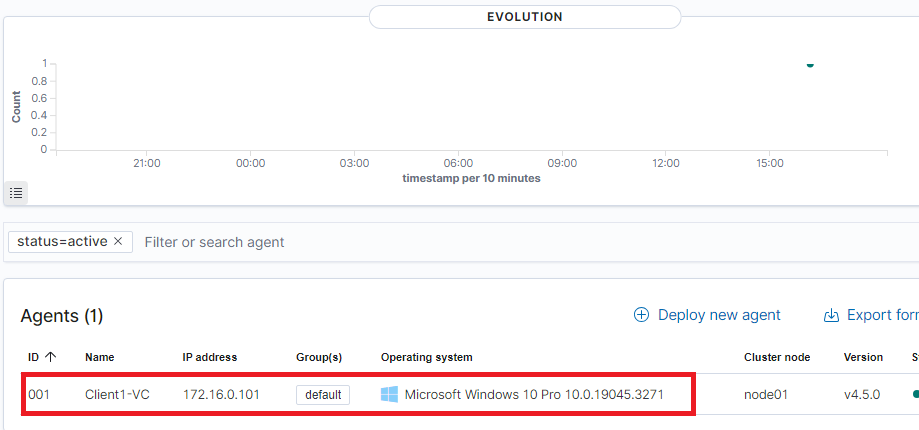
Now this dashboard is for the Client1 machine.
On the left-hand side, it shows us what top tactics were found and can be used against the machine.
On the right it shows us the number of recommendations we can do to help with compliance with specific laws and standards.
At the very bottom, there is the File Integrity monitor which reports to us if a specific file was made, changed, or deleted on specific locations.
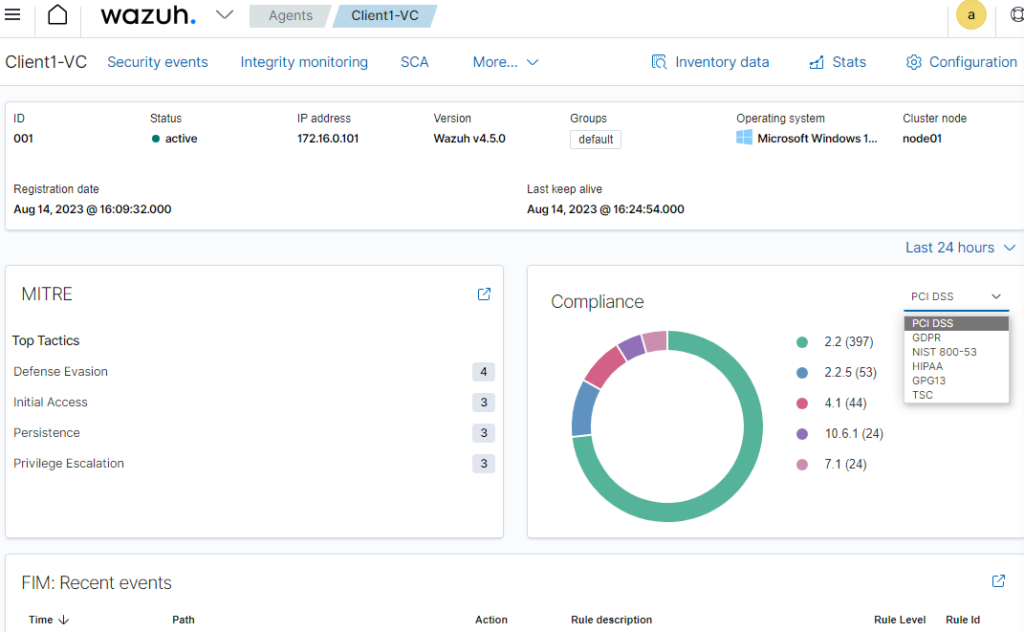
Below the FIM is an Event count.
And even further down we can see that the client1 machine was tested with a CIS benchmark test. And we seem to have failed it miserably with a 32%.

We can click on the benchmark for more information.
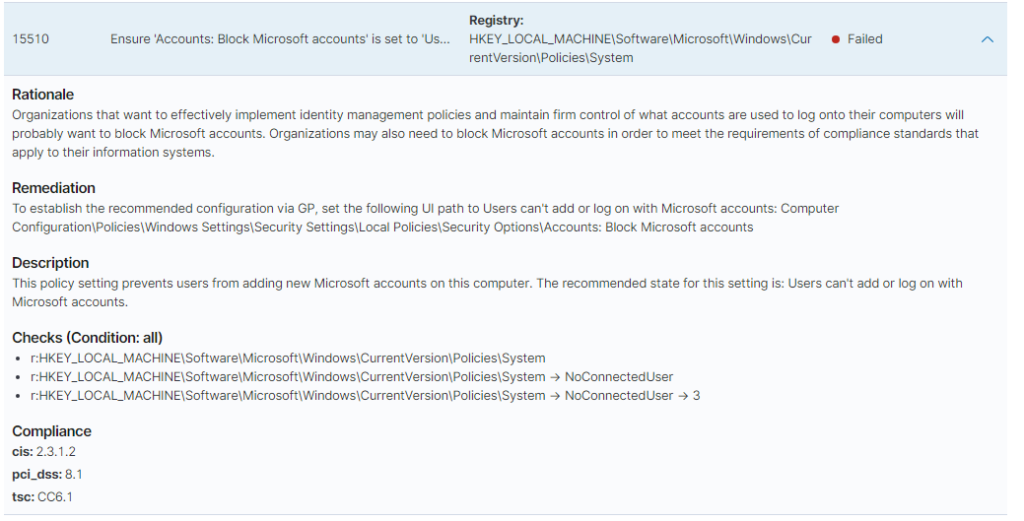
We will see the checks we have failed and passed. By clicking on a entry we can see what compliances it is tied to, the reason why we should care, how to fix it, and what it checks to confirm it.
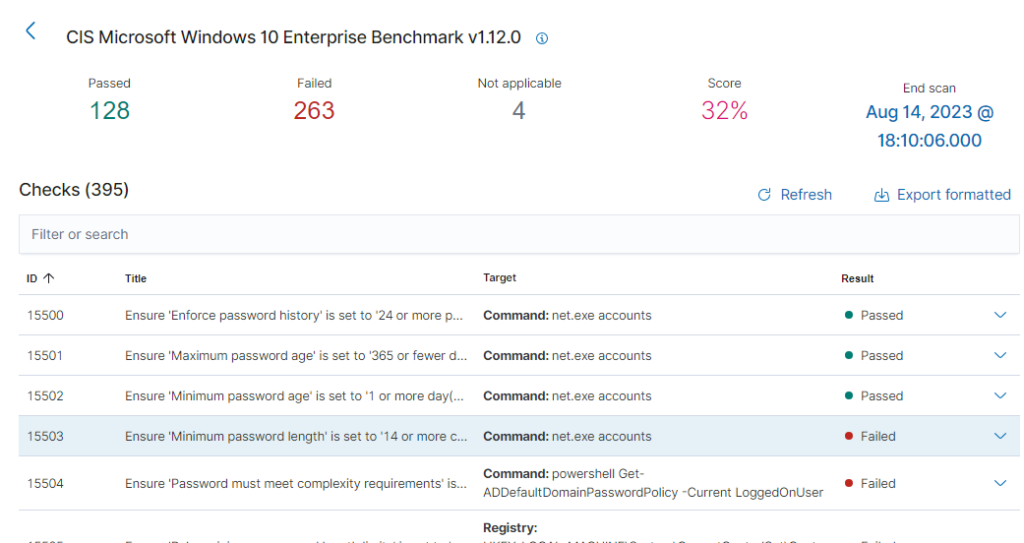
It’s very important for organizations to be compliant. Not doing so can put them at risk of being fined a hefty amount, loss of reputation and trust, and prison time can also get involved.
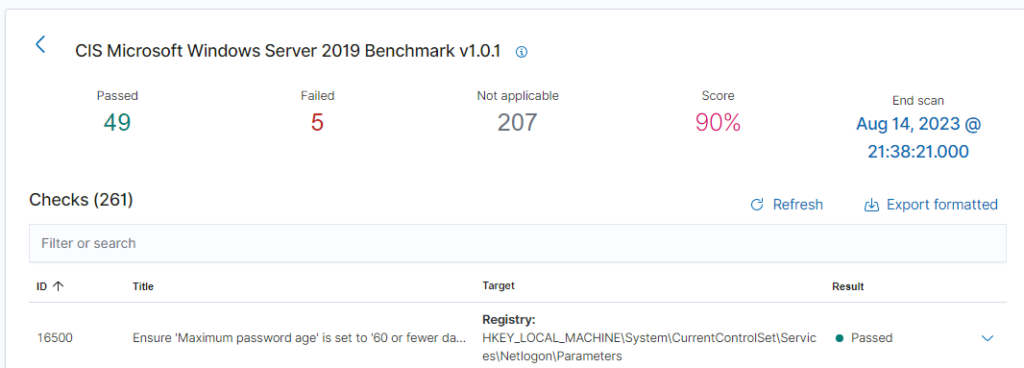
I also made the domain controller into an agent. The CIS benchmark test came back with a 72% Score on the first assessment.
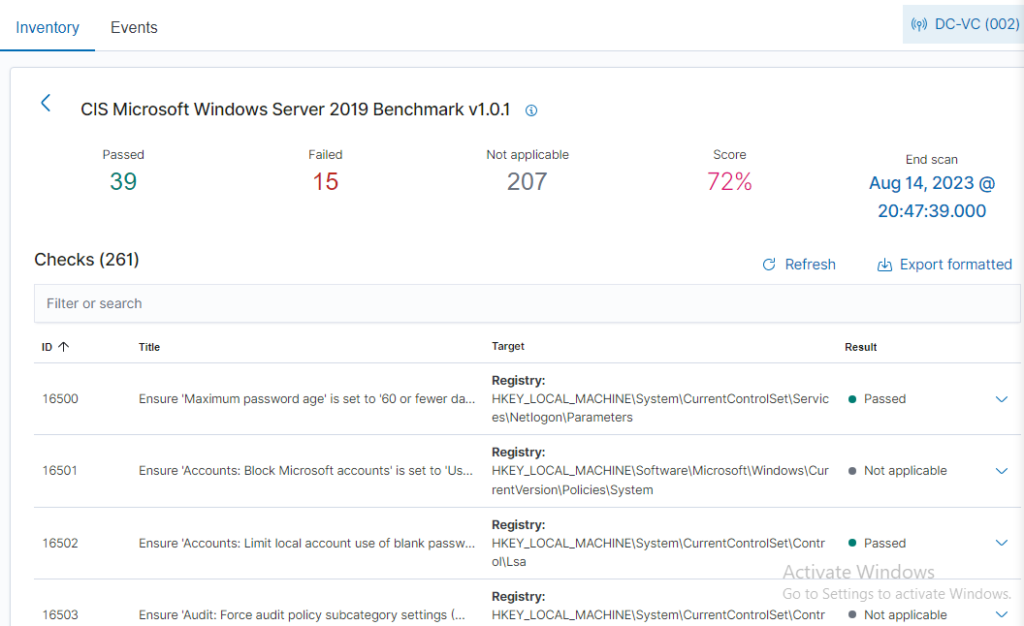
I messed around for a bit and remediated 10 failures. Managing to bring the score up to 90%. It was a lot of group policy changing. Going through the remediations is great practice and a learning opportunity. Client1 has 260+ failures, and I plan on going through those on my own time.
File integrity
monitors on any changes done to specified locations
Let’s take a look at file integrity. But first.. lets go over on how and where to configure Wazuhs configuration file for the FIM.
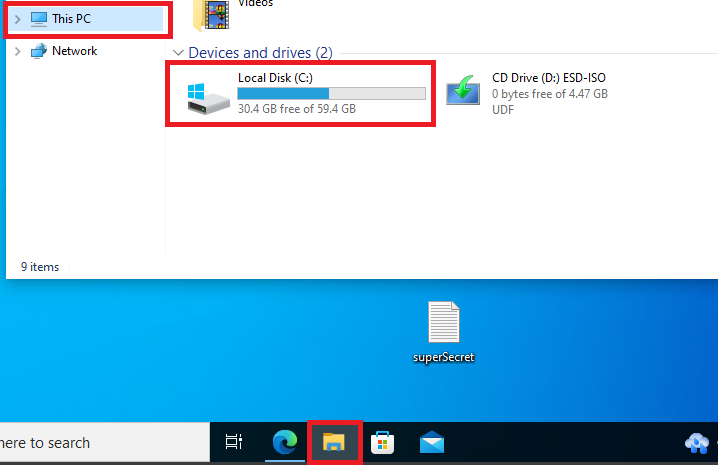
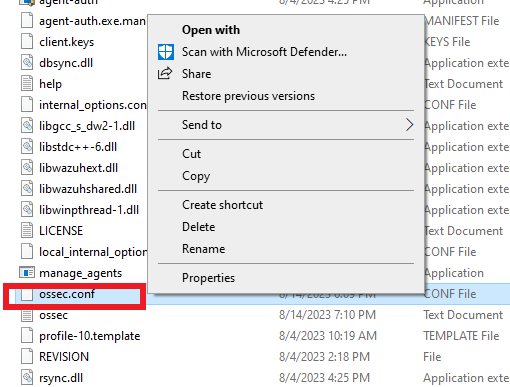
Open client1’s “File explorer”, click on “This PC”, then double click on “Local Disk”.
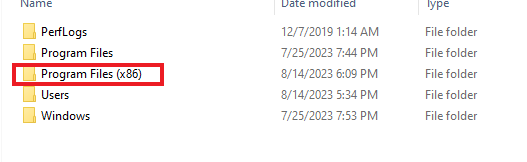
Then double click “Program Files (x86)”
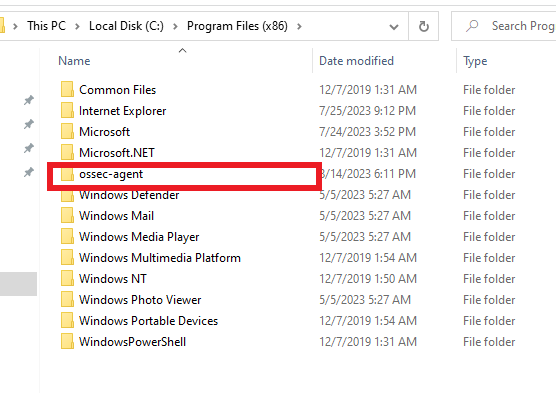
After that double click on “ossec-agent”. Click “continue” if the permissions pop-up appears.
Scroll down until you find “ossec.conf” then right click and open it with “Notepad”.
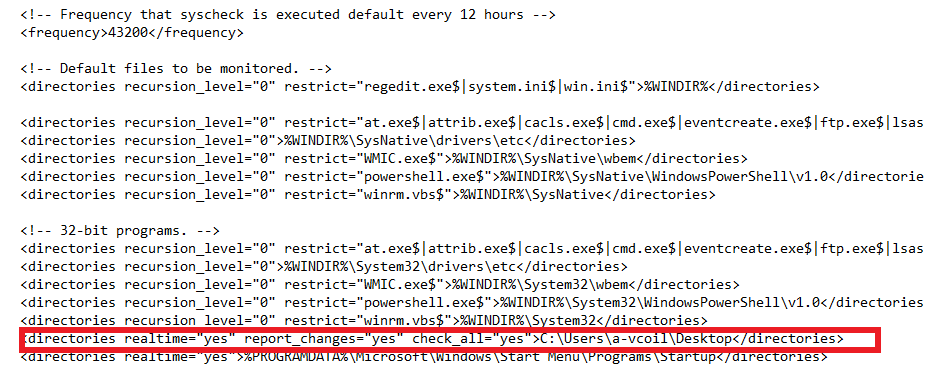
Once inside the Notepad, do a “ctrl+f” and search for “syscheck”. It will take you to the file integrity monitoring section. Here we can add what directories and files we want to monitor.

Below is the line that I added to monitor the desktop of the “a-vcoil” account. Make sure you put your username. After that just save the file.
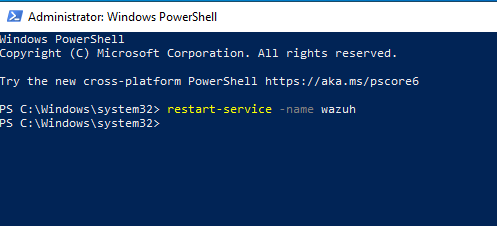
Once saved, open up “PowerShell” with administrator privileges and run the command “restart-service -name wazuh”.
I already had a “superSecret” note on my desktop before doing the changes. But you can make one and do some changes on the file.
The integrity monitor will show you any changes done to files and if any files were deleted.
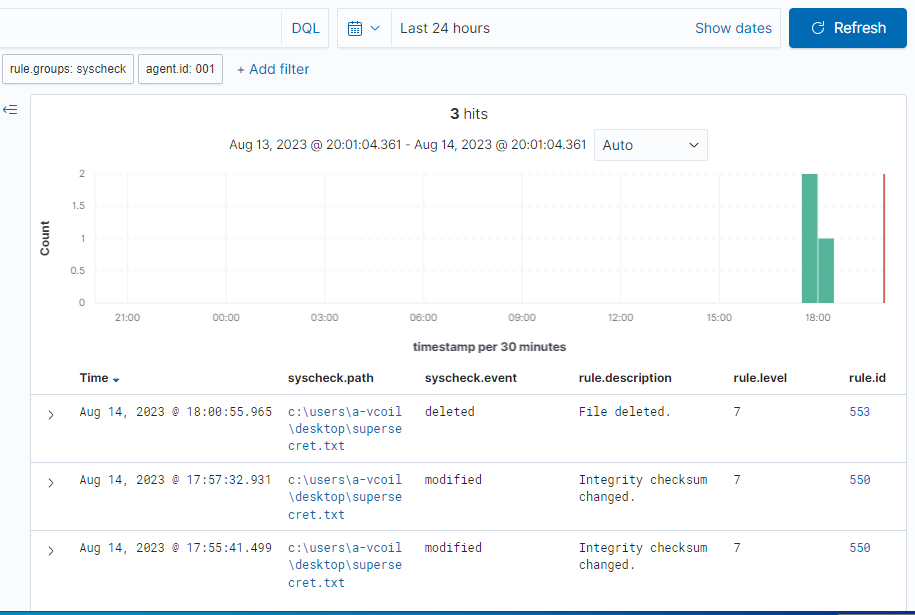
If you click on an event, it will show you the changes made, and additional information. As seen below, we can see the changes I made to the super secret file.

Vulnerabilities Module
Vulnerability Scanner in wazuh
In this section we will go over on how to enable the vulnerability module inside of Wazuh.
By default the Vulnerabily Module is off.
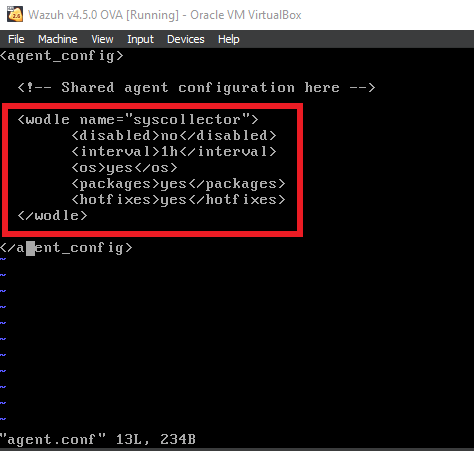
Inside of the Wazuh Server, vim into “/var/ossec/etc/shared/default/agent.conf”, and add in the code shown below. Save and quit the file.
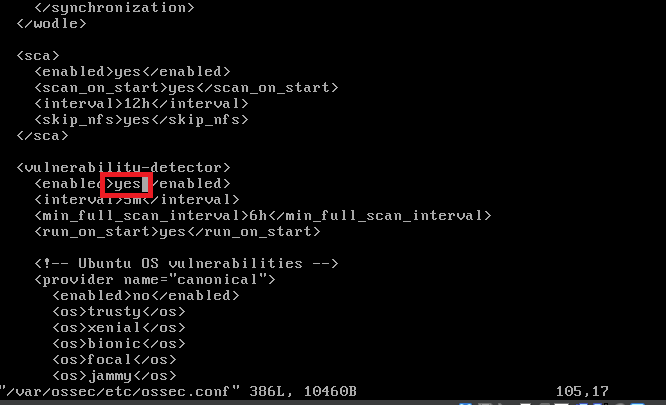
After adding that, vim into “/var/ossec/etc/ossec.conf” and you may have to scroll down until you notice “vulnerability detector”. Once found, change the “no” inbetween the “enabled” tags to “yes”. Save and quit the file.
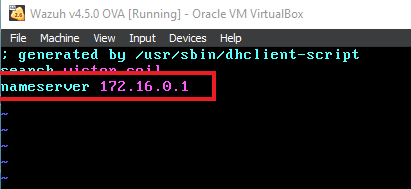
Ensure that in “/etc/resolv.conf” file the nameserver is set to the internal DNS IP. Which is the Domain Controller IP.
This will allow wazuh to pull the databases from NVD and MSU.
After making those changes and ensuring the nameserver is correct. Do a “Systemctl restart wazuh-manager” to restart the Wazuh service.
After a bit of time, you’ll be able to navigate to the vulnerability module and will see it reporting back on found vulnerabilities.
If you need to do additional troubleshooting because it’s not updating. This command helped me a lot. “cat /var/ossec/logs/ossec.log | grep -i -E “vulnerability”

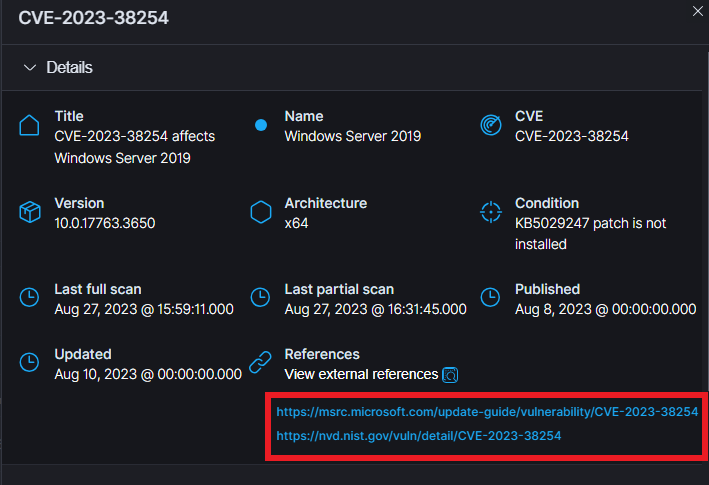
If you’re intesrested in the critical vulnerabilities, you can click on the number below it. So in this case, the red 22. This will filter for only the critical vulnerabilities.
Scroll down and you will see them.
For me, they sadly didn’t give out the remediations straight out like with the CIS benchmark tool, but it does give you references. These references usually give you the remediation or other ways to fix the vulnerability.
They do give you the condition, and usually when you see the “KBXXXXXX”. It just means to update the system.
This concludes the Wazuh Lab.